
More actions
| How To Recover Original Sysconfig Data from iPhone | |
|---|---|
| Device | iPhone 6, iPhone 6S, iPhone 6S Plus, iPhone 7, iPhone 7 Plus, iPhone 8, iPhone 8 Plus, iPhone X, iPhone XS, iPhone XS Max, iPhone 11, iPhone 11 Pro, iPhone 11 Pro Max |
| Affects part(s) | Main Logic Board, NAND |
| Needs equipment | Hot Air Station, Soldering Iron, JCID Programmers, JCID Software |
| Difficulty | |
| Type | Soldering |
"4. Extreme" is not in the list (1. Easy, 2. Medium, 3. Hard, 4. Specialist) of allowed values for the "Repair Guide difficulty" property.
Problem Description
When the original NAND of an iPhone is dead and replaced with a new chip, the device fails activation due to mismatch of serial number, Wi-Fi MAC address, and Bluetooth MAC address.
This issue occurs because SysConfig data stored on the original NAND is missing.

Symptoms
- Device flashes successfully but fails at activation screen.
- Serial number may appear as “XXXXXXXX” or a random serial number will appear.
- Wi-Fi and Bluetooth may not function or show random MAC addresses.
- iTunes / 3uTools may show “Activation Error” or “Could not activate iPhone.” (See Figure 1)
Diagnostic Steps
- Flash iPhone with new new NAND using 3uTools or iTunes.
- Observe that phone boots to setup screen but does not activate.
- Check Serial / Wi-Fi MAC / BT MAC — mismatch or missing.
- Confirm there is no baseband or logic board fault before proceeding (baseband/nfc issue can also cause activation failure).
Repair Steps
- Remove Bad NAND: Desolder the original faulty NAND chip from the logic board.
- Install & Flash New NAND: Solder new NAND, flash using iTunes/3uTools, confirm device boots (activation will still fail).
- Remove New NAND: Desolder the new NAND from the board again.
- Read SysConfig:
- Launch JCID Software.
- Connect JC V1S Pro with respective NAND or JC P13/P15 Programmer module to PC.

Select programmer and click connect. - Insert NAND into programmer.
- Go to Programmer Interface → Query Info → Query Code/Unbind.
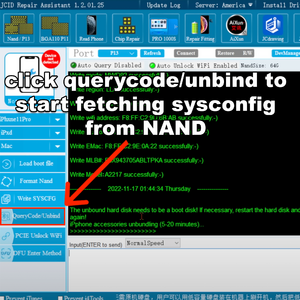
QueryCode/Unbind - JCID Repair Assistant - Wait (up to 30 mins) for software to retrieve original Serial, Wi-Fi MAC, BT MAC.
- Write SysConfig to NAND:
- Copy retrieved values.
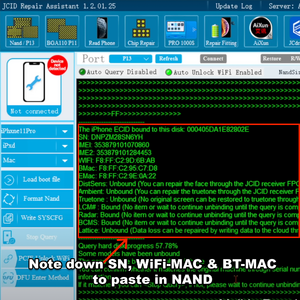
Note down SN, WiFi-MAC & BT-MAC - Paste values in respective fields.
- Click Write Selected Info in JC software to program data back into NAND.
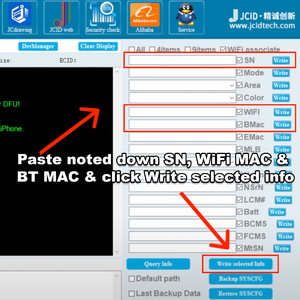
Paste and Write SN, WiFi-MAC & BT-MAC
- Copy retrieved values.
- Reinstall NAND: Solder NAND back onto logic board.
- Reflash Device: Perform clean flash with iTunes/3uTools to finalize.
- Verify Activation: Boot and confirm device activates normally and Wi-Fi/Bluetooth work.


