Problem
|
Solution
|
No power
|
The most common manifestation of a motherboard problem presents itself in a simple form, a phone that has no power. It is very common for a symptom to be the same for a multitude of different problems. The symptom can be no power, but the problem can stem from dozens or hundreds of different lines. Therefore, it is useful to try and categorize "no power" into something that narrows down the range of potential problems. To do this, there are a few tools that can help. The most commonly used tool by this author is the DC power supply.
A good first step to diagnosing "no power" is to see what happens when we connect DC power to the battery connector. With DC power connected, there are a lot of different possibilities that we can see. In a normal, working phone we will see an amp draw only after prompting the phone to boot that gradually rises from zero to around 1 amp.
Immediate current (before prompt to boot)
If, when we connect DC power to the battery connector, we see an immediate draw of current, this indicates we have a main line short to ground. Most commonly, a large current (2 A or more) indicates that we have a short on VDD_MAIN. However, we can also see this type of current stemming from VDD_BOOST, BAT_VCC, SPKRAMP_TOP_VBOOST, and any other line that ties directly into VDD_MAIN through any components. To identify the offending line, a multimeter is used to check the different lines for connections to ground. Once the line is confirmed, the hunt for the individual component starts.
There are a few different methods used for identifying a shorted component, all of which can be viable. In essence, something must provide voltage and something must show a heat differential. This author uses a combination of DC power to provide voltage (thus also provided heat) along with freeze spray in order to reveal the shorted component. If we freeze spray the entire board, then provide voltage directly to the shorted line, that voltage will move to and heat up the offending component. This reveals the problem by melting the freeze spray at that component. We can then visibly see the melted component. Once the component is replaced or removed, the line is clear and the phone will boot.
This specific problem can be viewed in full, from the finding of the problem to the solution at this video: https://www.youtube.com/watch?v=Xr3lcxkkOK8&t=1s
Zero current (after prompt to boot)
If we connect DC power and prompt the phone to boot but see zero current, that can indicate a few different problems. The worst case scenario would be that the CPU is dead, however, that is rarely the case unless the board has been overheated by another motherboard tech. Most commonly, zero current will indicate a shorted secondary power rail.
Common signature failue due to tech damage
Asking for history on dead no power or no boot devices can help lead to a solution. One of the most common issues is tech damage from slippage of pry tools and screwdrivers. If history comes in for screen repair or known to have been working and then after opened it stop working check capacitor C2647. This capacitor is on the edge of the logic board next to the NAND memory. This capacitor commonly gets damaged when the screen gets pushed down and the bracket from the screen cracks and damages the capacitor causing it to fail and short to ground circuit line PP1V8_IO. The behavior you will get from diagnosing with DC power supply upon prompt to boot is current draw of around 400 mA cycling.
((In Progress))
|
Turns on but does not charge
|
If the phone turns on but doesn't charge, you'll want to first rule out a parts issue:
- Unplug everything, ear speaker flex, power button flex, cameras, antennas, etc.
- Only leave the screen, charging port and battery, then test again
- If still not charging, test with a known good charging port, battery and screen.
Troubleshooting & Solutions:
- Sometimes, the ear speaker flex, which has a flood illuminator (for Face ID) and ALS sensor (for auto brightness and true tone), will get liquid damaged
- These sensors sit right by where the ear mesh is located and it's super easy for liquid to sneak into the phone and get on these sensors. The corrosion will short data lines underneath them and cause bootlooping, not charging and other random issues.
- If this is the case, you can either
- Replace the flex and lose Face ID
- Or safely remove the flood illuminator off the flex, clean off the corrosion and place it back
- Or sometimes the flex is damaged beyond repair, so you can swap the sensors to a new flex.
- In majority of cases, you'll find that replacing Tigris (U3300) will solve charging problems
- Tigris will give the common "Tristar" issues that you would see on iPhone 7 and older models.
- I would recommend you split the sandwich & test charging with just the top board, battery, charging port and screen.
- If you get 0.006 A or something very low, try replacing Tigris
- If it's still not charging, then the next most likely will be the Tigris Coils, L3340 and L3341.
- Replace them and test if it charges with just top board. If it does, then it's solved.
- In rare cases, Hydra will be the cause of the no charging.
- Replace Hydra and see if that solves it.
|
Touch not working
No Touch
|
When dealing with an iPhone X with No Touch, first step is to rule out a parts issue:
- Unplug everything, ear speaker flex, power button flex, cameras, antennas, etc.
- Only leave the screen, charging port and battery, then test again
- If still not charging, test with a known good charging port, battery and screen.
Please note, there are 2 version of the iPhone X.
- Qualcomm (CDMA) A1865
- Intel (GSM) A1901, A1902
Troubleshooting and Solutions
Sandwich Separation
- Most common cause of No Touch is separation between the top layer and interposer. AKA sandwich separation
- Diode mode the Touch Connector (J5800)
- If you find any lines that are OL, when they should have a Diode Mode reading, high chance the issue is the sandwich separating
- Using a preheater/bottom heater, separate the top layer from the interposer
- Check for any ripped pads
- If ripped pads, you'll need to repair them by scratching out the vias and traces, which may be difficult in some cases, as the traces are very fragile and small.
- Then use an iSocket type of jig, that allows you to connect the top and bottom boards temporarily using spring loaded pins.
- If touch works, then reball the sandwich and diode mode the touch connector again.
- If the missing Diode Mode readings are back, then it should be solved
- Sometimes, the damage on the board is not the top layer, but on the bottom layer or bottom board and it requires a bottom board swap
- Check if the board bends near where the SIM slot meets the interposer. Often times you'll see separation in that area.
- Split the sandwich, then test the top and bottom boards in the iSocket type of Jig.
- If still no touch, test the top board with a known good bottom board of the same version (QCOM/Intel). Doing this will cause baseband and Wi-Fi not to work, but that's not important right now. We're just testing if touch works
- If touch works with another bottom board, but not the original, then it's related to the bottom board and must be swapped.
- There are some chips that are paired on the bottom board and must be swapped over.
- BBCPU (U_MDM_E_)
- Baseband Eeprom (U_EEPROM_E)
- Be careful; if you damage or lose this chip, then it's game over. Cellular function will never work.
- A safe way to deal with this, use a eeprom reader, like the JC Module Eeprom reader for the iPhone X.
- While BBCPU is already removed on both original and donor bottom boards, plug in the bottom board to the appropriate slot and read using the JC PC Software. Then remove the bottom board.
- Then plugin the new bottom board and click write.
- Make sure not to mix these up! If you overwrite the original eeprom and lose that data, then it's also gone forever. No way to recover it.
- NFC (NFC_S)
- Although NFC is not required to swap over, it will add extra time to the job if you dont swap it, as you have to go through the "Swipe to recover"/"Attempting data recovery" screen which can take 10–15 min to process.
- Wi-Fi (UWLAN_W)
- Although it's paired, you can unpair it using the iRepair P10 or similar tool that allows you to set the device into Purple Mode and unbind via the lightning port.
- Here's a video on how to unpair WiFi from the iPhone X: https://youtu.be/exi0F4oMSCI
- Once you swap over all the components above, test again with the iSocket Jig. Make sure all functions work, like:
- You can toggle Wi-Fi on/off
- There is touch
- The phone says "No SIM"
- If it says "Searching" or "No Service" or "Cellular Update Failed", check the sandwich connections again. Make sure there's no dirty flux all over the pads.
- Try reballing BBCPU again, might have been a bad job
- Try reading the original eeprom and writing it the replacement board
- Worst case, try an update on iTunes or 3u tools (flash and retain data), to see if that solves it.
- I don't recommend to restore or you will "lock" yourself out and it will require you to restore each time you "fix" the board issue.
- This video goes over in detail, how to diagnose the bottom board issue and how to do a bottom board swap: https://youtu.be/Mx8836-Xu0M
- If you still have No Touch with known good bottom board, then check this
- Check the line PP5V25_TOUCH_VDDH for a short or partial short.
- See if the diode mode reading is about 0.643 V
- If it's shorted to ground or reading low like 0.235 V, then you have a short.
- Pull C5645 and check the diode mode reading again. If it's reading normal at 0.643 V, then replace C5645
- C5645 is 4 μF, 20%, 6.3 V, CER-X5R, 0201
If you did the above but still no touch, try checking all your tools and parts.
Sometimes there's flux that gets the iSocket dirty
Or the extension flex for the iSocket gets damaged leading to no touch
Or maybe your tester screen went bad.
|
Wi-Fi grayed out
|
In majority of cases, this will be require a bottom board swap.
The bottom layer and interposer break near the SIM tray area.
Refer to the above "No Touch" solution for a detailed walk through on a Bottom Board Swap process.
It's the same repair steps.
|
Baseband Issues
No Service
Always Searching
|
- Here are the symptoms for cellular signal issues
- With no SIM Card installed, the phone is always "Searching..." or "No Service".
- A working phone will show "No SIM" with no SIM Card installed.
- Dial *#06# in the phone app, and nothing happens
- A working phone with no Baseband issue, will make the IMEI pop up.
- If you go to Settings > General > About > Model Firmware is blank
Troubleshooting & Solutions:[edit | edit source]
Sandwich separation
- Split the sandwich & check for ripped pads on the top layer
- If so, try to fix the ripped pads by scratching out the vias/traces & rebuild the pads using solder lugs
- If no obvious bends, then test the 2 layers with the iSocket type of jig. This allows you to connect the 2 layers without soldering, for testing purposes.
- See if the above symptoms are resolved. If so, sandwich the 2 layers back together & fully test with an active SIM & make sure all functions work
- Including making a phone call & checking for sound through phone call
- No sound during a phone call points towards a bad sandwich reball or separation
Bottom Board Swap
- Doing a bottom board swap is an easy way to rule out the whole cellular circuit, as it's pretty much all located on the bottom board.
- You do need to transfer the BBCPU, BB Eeprom & WiFi.
- See the above "No Touch" solution with the bottom board swap instructions & details.
- This video goes over in detail, how to diagnose the bottom board issue and how to do a bottom board swap: https://youtu.be/Mx8836-Xu0M
BBCPU Reball
- You can considering trying a BBCPU reball to see if this fixes the baseband issue
- This is good for someone who doesn't have a replacement bottom board available.
- Although there's a lower chance of success, as baseband issues aren't always a BBCPU reball solution.
- It could be BBPMU
- Or some other part of the complex circuit.
Please note: If you attempt the above repairs, but it's still stuck in "Searching..." or "No Service", then flash an update (DO NOT RESTORE). This can sometimes solve the issue. Not sure why it is needed sometimes.
If a phone with a baseband problem is restored, then the iOS software will "erase" the IMEI (baseband info) in the phone and will require the board issue to be fixed, then restored again, so the software will bring back the IMEI.
If you restore, and still has no IMEI, then a baseband/board issue is still present on the board. That will need to be fixed, then restored again.
|
Random Restarting
3 Minute Restart
|
Symptoms:
- The phone will restart every 3 minutes or so
Solution:
- For iPhone X and newer, there are sensors that are required to be detected by the operating system, otherwise, the phone will restart every 3 minutes.
- Many times, this can happen after a hard drop, housing replacement or back glass laser repair.
- You can look up the Panic Log in the Settings > Privacy > Analytics & Improvements > Analytics Data > then scroll down to the files that start with "panic-full..."
- If you can find in the panic log "thermalmonitord..." and "missing sensor(s): Prs0" or "Mic1", then the issue will be due to a bad charging port
- Make sure you have the charging port plugged in
- Make sure the replacement port is OEM or Premium quality.
- Aftermarket charging ports can still cause it to restart, even if it is charging fine
- Here's a detailed video on how to read panic logs for troubleshooting random restarts: https://youtu.be/QaJLYbtuCGA
|
No Image
No "Backlight"
|
iPhone X uses an OLED display. This mean, there's no backlight, but many people will still diagnose No Image as "No Backlight".
Always make sure to test with a known good screen, to rule out a parts issue.
Symptoms:
- Phone turns on but nothing displays on the screen
- Screen always stays black
- You can hear sounds & feel vibrations.
Solution:
- Diode mode the display connector (J5700) & check for any shorts or OL (Open Lines).
- In most cases, you'll find PP3V0_DISPLAY_CONN filter FL5783 is blown & needs to be replaced.
- In other cases, you may find one or more of the 5 chokes L5700, L5710, L5730, L5740 or L5720 is damaged or broken from pry damage
- In rare cases, you may discover there is long screw damage in the screw hole next to the battery connector, which will sever image lines from the chokes mentioned above.
|
Bootlooping
Error 4013
|
Symptoms:
- Shows apple logo for about 5 seconds, then blank, then apple logo, then blank
- Sometimes it shows a green flash for a second
- If you try to flash an update or restore, it fails right away with an Error 4013
- If you flash on 3u tools, it fails at 19%
Solution:
Flex Cables:
- Step 1 in this case is always unplug all the flex cables.
- Ideally test the board with known good Screen, Battery & Charging Port.
- If it boots, then one of your flexes is the cause.
- 99% of the time, it is the ear speaker flex. The Flood Illuminator and/or the ALS has liquid damage.
- The ear speaker flex is paired to the logic board for Face ID.
- If you want to keep Face ID, you'll need to repair the flex. If Face ID is not important, then you can just replace the flex.
- To repair the flex, you'll have to desolder the component & clean out all the corrosion, then place them back.
- If the corrosion is too severe & it damaged the flex, then you'll need to swap the Flood Illuminator and ALS to a new flex, otherwise, you'll lose Face ID.
- In some cases, another flex can cause this issue like a bad charging port.
- In this case, just replace the flex
Sandwich Issue:
- In some cases, the bootlooping and Error 4013 is caused by liquid damage on the bottom board.
- Underneath the interposer, there are solder balls that connect to the bottom layer.
- This solder is leaded high temp solder, so it's not easy to separate.
- But you can split the top layer & test with a known good bottom board & see if it boots. If so, then your issue is on the bottom board
- Inspect the space between the interposer and bottom layer & check for any signs of corrosion.
- In some cases, you can get away with reflowing the area you find the corrosion.
- The bubbling of the flux can cause enough friction to clear the corrosion causing bridging between pads.
- If this doesn't work, you'll need to do a bottom board swap to get the device working.
Please Note: If the phone is stuck in Recovery Mode because it failed at the Error 4013, you have 2 options
- Kick the device out of Recovery Mode using 3U Tools. In the main screen of 3U Tools, you'll see a button that says "Exit Recovery Mode"
- You can attempt another update or restore.
Assuming you fixed the root cause of the bootlooping issue, the above 2 options should get you a working phone.
If it still fails at 4013 or still bootloops, then you haven't solve the issue.
|
Move lower / higher when configuring Face ID
|
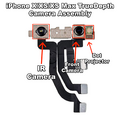
The dot projector has failed, or its crystal got damaged. If you see physical damage, replace the crystal, if not, fix the dot projector flex Video
|
Singleboard boot-up
|
For iPhone X Intel version. Below IOS12 you need to apply 1.8 V to S48 (connect S41 to S48) to boot into the system. Above IOS12 you need to flash the firmware to boot into system. (no need to apply voltage)
|
Activation issue
|
NFC chip malfunctioning will cause activation issue.
|