
More actions
IamMyron07 (talk | contribs) |
IamMyron07 (talk | contribs) |
||
| Line 23: | Line 23: | ||
== Repair Steps == | == Repair Steps == | ||
=== Method 1: Traditional NAND Desolder & Programmer Write === | |||
# Remove Bad NAND: Desolder the original faulty NAND chip from the logic board. | # Remove Bad NAND: Desolder the original faulty NAND chip from the logic board. | ||
# Install & Flash New NAND: Solder new NAND, flash using iTunes/3uTools, confirm device boots (activation will still fail). | # Install & Flash New NAND: Solder new NAND, flash using iTunes/3uTools, confirm device boots (activation will still fail). | ||
| Line 39: | Line 40: | ||
# Reflash Device: Perform clean flash with iTunes/3uTools to finalize. | # Reflash Device: Perform clean flash with iTunes/3uTools to finalize. | ||
# Verify Activation: Boot and confirm device activates normally and Wi-Fi/Bluetooth work. | # Verify Activation: Boot and confirm device activates normally and Wi-Fi/Bluetooth work. | ||
=== Method 2: Direct SysConfig Recovery in Purple Mode (iPhone 8–X) === | |||
# Install & Flash New NAND: | |||
#* Solder new NAND. | |||
#* Flash device once. | |||
# Boot to Purple Mode: Use JC P13/P15/iRepair P10 or any compatible tool to enter Purple/Diag Mode. | |||
# Recover SysConfig: | |||
#* Connect device to PC with programmer software open. | |||
#* Select Recover SysCfg in the tool interface. | |||
#* The software will pull Serial / Wi-Fi / BT data directly from device’s original SysConfig partition (server-side or local backup). | |||
# Write SysConfig: | |||
#* Write recovered data directly back to NAND via the programmer tool (without desoldering). | |||
# Reflash Device: Perform a clean flash with iTunes/3uTools once more. | |||
# Verify Activation: Boot, complete setup — device should now activate normally with correct serial and functional Wi-Fi/Bluetooth. | |||
Revision as of 08:09, 21 September 2025
| How To Recover Original Sysconfig Data from iPhone | |
|---|---|
| Device | iPhone 6, iPhone 6S, iPhone 6S Plus, iPhone 7, iPhone 7 Plus, iPhone 8, iPhone 8 Plus, iPhone X, iPhone XS, iPhone XS Max, iPhone 11, iPhone 11 Pro, iPhone 11 Pro Max |
| Affects part(s) | Main Logic Board, NAND |
| Needs equipment | Hot Air Station, Soldering Iron, JCID Programmers, JCID Software |
| Difficulty | ◉◉◉◉ Specialist |
| Type | Soldering |
Problem Description
When the original NAND of an iPhone is dead and replaced with a new chip, the device fails activation due to mismatch of serial number, Wi-Fi MAC address, and Bluetooth MAC address.
This issue occurs because SysConfig data stored on the original NAND is missing.

Symptoms
- Device flashes successfully but fails at activation screen.
- Serial number may appear as “XXXXXXXX” or a random serial number will appear.
- Wi-Fi and Bluetooth may not function or show random MAC addresses.
- iTunes / 3uTools may show “Activation Error” or “Could not activate iPhone.” (See Figure 1)
Diagnostic Steps
- Flash iPhone with new new NAND using 3uTools or iTunes.
- Observe that phone boots to setup screen but does not activate.
- Check Serial / Wi-Fi MAC / BT MAC — mismatch or missing.
- Confirm there is no baseband or logic board fault before proceeding (baseband/nfc issue can also cause activation failure).
Repair Steps
Method 1: Traditional NAND Desolder & Programmer Write
- Remove Bad NAND: Desolder the original faulty NAND chip from the logic board.
- Install & Flash New NAND: Solder new NAND, flash using iTunes/3uTools, confirm device boots (activation will still fail).
- Remove New NAND: Desolder the new NAND from the board again.
- Read SysConfig:
- Launch JCID Software.
- Connect JC V1S Pro with respective NAND or JC P13/P15 Programmer module to PC.

Select programmer and click connect. - Insert NAND into programmer.
- Go to Programmer Interface → Query Info → Query Code/Unbind.
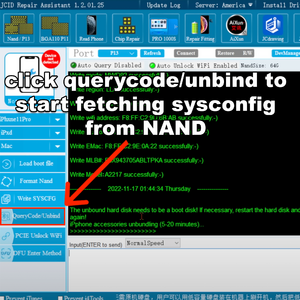
QueryCode/Unbind - JCID Repair Assistant - Wait (up to 30 mins) for software to retrieve original Serial, Wi-Fi MAC, BT MAC.
- Write SysConfig to NAND:
- Copy retrieved values.
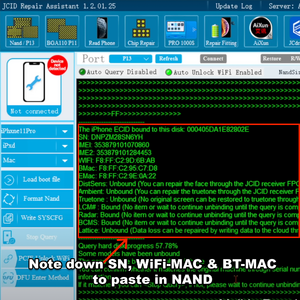
Note down SN, WiFi-MAC & BT-MAC - Paste values in respective fields.
- Click Write Selected Info in JC software to program data back into NAND.
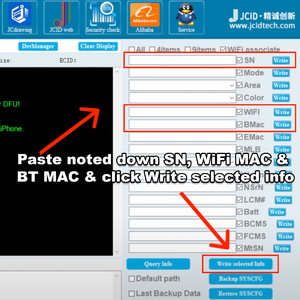
Paste and Write SN, WiFi-MAC & BT-MAC
- Copy retrieved values.
- Reinstall NAND: Solder NAND back onto logic board.
- Reflash Device: Perform clean flash with iTunes/3uTools to finalize.
- Verify Activation: Boot and confirm device activates normally and Wi-Fi/Bluetooth work.


Method 2: Direct SysConfig Recovery in Purple Mode (iPhone 8–X)
- Install & Flash New NAND:
- Solder new NAND.
- Flash device once.
- Boot to Purple Mode: Use JC P13/P15/iRepair P10 or any compatible tool to enter Purple/Diag Mode.
- Recover SysConfig:
- Connect device to PC with programmer software open.
- Select Recover SysCfg in the tool interface.
- The software will pull Serial / Wi-Fi / BT data directly from device’s original SysConfig partition (server-side or local backup).
- Write SysConfig:
- Write recovered data directly back to NAND via the programmer tool (without desoldering).
- Reflash Device: Perform a clean flash with iTunes/3uTools once more.
- Verify Activation: Boot, complete setup — device should now activate normally with correct serial and functional Wi-Fi/Bluetooth.