More actions
| Nintendo DS Lite not turning on | |
|---|---|
| Device | Nintendo DS Lite |
| Affects part(s) | Main Logic Board |
| Needs equipment | Tri-Wing Screwdriver |
| Difficulty | ◉◉◉◌ Hard |
| Type | Soldering, Part replacement |
Problem description
The device does not turn on when the power button is used.
Symptoms
- Power LED stays off
- Both screens stay off
- There is no sound
Diagnostic Steps
One or more part failures can lead to this problem. The symptoms differ slightly depending on what part is bad. Compare your device to the following table to find the most likely cause of this issue. All test are considered to be done with a known good battery. This table only applies when a good battery was used.
| Symptomps | Actions |
|---|---|
| Does charge, but not turn on. |
|
| Does charge, but not turn on.
Green light flashes for a second when trying to power up. |
|
| Does not charge or turn on |
|

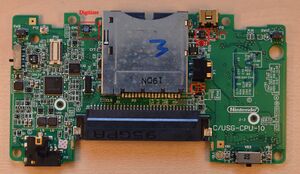
First, disassemble the device as far as needed to access the part you want to check. Please refer to Figure 1 for location reference.
Check the power button / slider
The power button is located on the bottom side of the PCB labelled SW13.
The switch has 4 pins. Take the following measurements without using the button:
- Pin 2 to pin 3 - shorted
- Pin 1 to pin 2 / 3 - open
- Pin 1 to pin 4 - open
- Pin 4 to Pin 2 / 3 - open
If you use the power button, pin 1 should now be shorted to pin 2 and 3. If that's not the case, you have a faulty power button. To make sure the diagnosis is correct, use known good parts to connect both screens and the wifi module, connect a charged battery (polarity!) and then short the power button pin 1 to pin 2 and 3 with tweezers. If the device turns on, this is the only problem. Continue with Replacing the power switch
Check screen ribbons and WiFi module connections
Make sure all ribbons are plugged in straight and not at an angle. All screens must be fully connected. Make sure the WiFi module is connected. The wifi antenna is not neccessary to boot. Then connect a charged battery (polarity!) and use the power button or short the power button pin 1 to pin 2 and 3 with tweezers if you have a defective power button. If the device turns on, this is the problem.
Check fuse F2
Fuse F2 is located near the power connector and the DS Game slot pins on the bottom side of the PCB. Check this fuse for continuity using your multimeter. If it is broken (measures as high resistance), continue with Replacing F1 / F2.
Check for faulty WiFi Module
There are two ways to check this:
- Check the WiFi module to test in a known good device. If the device still turns on, the WiFi module is good. If not, replace the WiFi module.
- Check the device to test with a known good WiFi module. If the device turns on, the WiFi module is defective. If it stays off, the WiFi module might be OK, but we can't know for sure unless it is tested to be working in another device or in the same device later on after all other issues are fixed.
Check fuse F1
The fuse F1 is located right next to the power connector and EM10. Check this fuse for continuity using your multimeter. If it is broken (measures as high resistance), continue with Replacing F1 / F2
Check EM10

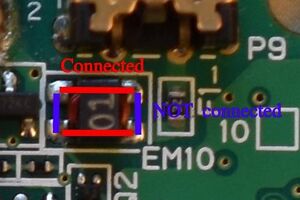
EM10 is located right next to the charging connector and F1. Check for continuity. The pins parallel to the charging port should be connected. See Figure 2. If there is no continuity between those pins, or if there is continuity to other pins, continue with Replacing EM10.
Check the power connector
Visually inspect the power connector. If you see any bent pins or other damage, replace the connector. Plug in a known good USB power cable. Measure for continuity from the cable to the pins of the power connector. If the connector does not pass this test, continue with Replacing the power connector.
Repair Steps
Replacing the power switch
Desolder the defective power switch. Solder in a new power switch.
Replacing F1 / F2
Desolder the broken fuse and clean the pads. Do not just remove the fuse and put in a wire instead, as this can and probably will lead to more damage if this isn't the only problem with the device. Replace it with a proper fuse. When buying the fuse, make sure the amperage rating is the same as the original (0,5A, unverified!), and the size is 0603.
Replacing EM10
Desolder the filter EM10 and replace it with a new one. If none is available, or to test if this fixes the issue, you can bridge the pins that should appear as connected. Be aware that in doing so, your device will be more susceptible to instabilities with cheap, low quality power supplies.
Replacing the power connector
Desolder the 6 pins of the power connector from the top side of the PCB and remove the broken power connector. Once desoldered, clean the pads so that a new power connector can be resoldered.
