More actions
| How To Fix iPhone 7 With Grayed Out Speaker Icon, Audio IC Repair | |
|---|---|
| Device | IPhone 7, IPhone 7 Plus |
| Affects part(s) | Main Logic Board |
| Needs equipment | Soldering Iron, Hot Air Station, Microscope |
| Difficulty | ◉◉◉◌ Hard |
| Type | BGA, Soldering |
Problem description
Audio IC Issue — Grayed out speaker button during a call
Some people also call this "Audio Disease"
On older iOS versions, the device will get stuck on Apple logo for ≈7 minutes but then boot up fine and work, but experience audio issues.

Symptoms
- Voice Memo app doesn't record
- No sound in certain apps
- Mic doesn't work for Siri
- Lightning to 3.5 mm headphone jack doesn't work
- Lightning headphones don't work
Solution
Diagnostic Steps
These are the two of the best steps to diagnose the Audio IC failure.
1. Make a call
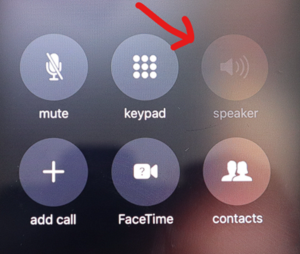
The speaker button is grayed out.
- If the phone has been experiencing audio issues and you have a supported SIM card available, the first thing to do is make a call and see if the speaker button is grayed out.
- Calling 611 is the easiest option, as it is the universal phone number for the carrier's customer service. This will allow you to test the speakers, as there is a recorded voice on the other end of the call.
- Usually, the speaker button will be grayed out if the Audio IC issue is present.
- Sometimes, the speaker icon won't be grayed out, but there will be no audio out the ear speaker.
- Or sometimes the speaker icon can be enabled, but just turns off within seconds. You turn it back on and it turns off again.
Please Note: Bluetooth audio, including AirPods, will still work fine when an iPhone 7 or 7 Plus has Audio IC issue present.
2. Voice Memo App

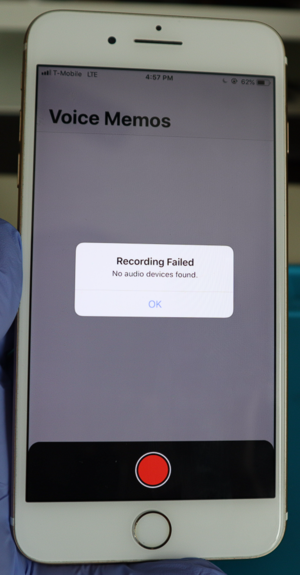
Voice Memo App Doesn't Record
- If you don't have a supported SIM card available, you can also use the Voice Memo app.
- Depending on iOS version, you will have different symptoms here.
- iOS 11 and older, the voice memo app will have a grayed out record button
- iOS 12 will show "Recording Failed, No audio devices found" pop up when you click record.
- iOS 13 and 14 will allow you to click the record button, but nothing happens. No recording starts. (See video at 0:28 https://youtu.be/IoGEWsZtOiE?t=28) (Also see iOS 12 vs iOS 13 behaviors here: https://www.instagram.com/p/B3IUb6qnm4T/)
- Sometimes, the voice memo app will allow you to record, even though the user has experience intermittent audio issues.
- In these cases, you can start recording a voice memo, while at the same time, gently twisting the frame for 5–10 seconds. Then playback the recording
- If Audio IC issue is present, you'll hear the playback audio with distortions and abnormal sounds.
Repair Steps
Warning: Attempting this repair without enough experience with microsoldering, may lead the a "Baseband" issue, where you have "No Service" or non-stop "Searching..." issue. Proceed with caution.
Reball Audio IC U3101 and add C12 and D12 Jumpers
The reason why the Audio IC issue occurs is due to the C12 and sometimes the D12 pads under the IC will break. Both of these pads are critical for the audio function of the phone to work. If either of these pads are broken or loose, you'll get the symptoms mentioned above.
Making these 2 jumpers are critical to permanently solving the Audio IC issue, regardless if the pads break during IC removal or prepping the pads with your iron. Do not skip this step.
Sometimes, you'll run into a case where H12 and/or J12 will also break when removing the IC or prepping the pads, but these two pads do not cause the symptoms described above. If either of these two break, it would cause no audio through the lightning port, like using headphones through a lightning to 3.5 mm headphone jack adapter.
Adding jumpers for H12 and J12 is optional.
Making The Jumpers Under Audio IC U3101

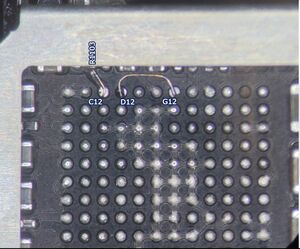
See example jumpers: Audio IC jumper solution: C12 and D12
C12
- Scratch out the trace that goes from C12 to R1103.
- Zoom in close enough to see the trace and use a blade to gently scratch out that trade.
- Then tin the trace
- Install jumper wire
- Add UV Mask to hold the jumper in place.
- See video at 20:35: https://youtu.be/jr5lvCFTgoo?t=1235
- The C12 pad may or may not break off, but the jumper wire must take up the space where the C12 pad would sit, to ensure the solder ball on the IC makes contact with the wire.
- Some people prefer to keep the wire straight across like in the example image here
- Some people prefer to curl the end of the wire so it makes a "J" shape or coiled shape.
- In either case, it will work.
D12
- D12 is a bit rare to break off, but it does happen, so it is recommended to jump this to avoid any warranty issues in the future
- There are many places you can jump D12 to, but the most practical being to jump to G12
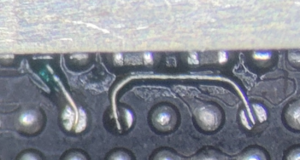
- You can achieve this by make the jumper in the shape of a staple, by attaching the jumper to the pad, go up, then 90° to the right, then 90° down to G12
- Make sure to give a lot of clearance and not have the jumper wire to close to the surrounding pads
- Make sure to not let the jumper wire touch the components above it either.
- No need to scratch out any traces in this case.
- Add UV Mask towards the top of the jumper wire. This will hold the jumper in place
- See video at 12:14: https://youtu.be/IoGEWsZtOiE?t=734

The final result should look something like this: Audio IC C12 and D12 jumpers with UV Mask
Other Jumpers
- If F12, H12, J12 or any other pads rip, follow the path of each pad and solder the wire to that component
- F12 should run a jumper to C3220
- H12 should run a jumper to R3103
- J12 should run a jumper to R3104
The Audio IC Chip - Reuse or Replace?
Please note: The root cause of the Audio IC issue is not caused by a bad Audio IC chip, so replacing it is not required. You can reuse the same IC by reballing the IC and placing it back once the jumpers are installed.
Sometimes, the IC gets damaged during removal and you will experience these issues:
- Voice Memo App will record just fine and play back fine
- Speaker button is not grayed out and working, but only bottom loudspeaker works. If you turn off speaker mode, the ear speaker will have no sound.
In this case, replace the IC and that should solve the no ear speaker sound after Audio IC repair attempt.
If you experience No Power or Overheating, then try removing the IC and test again.
Be aware that the phone will boot without the Audio IC installed. So if the phone boots up without the Audio IC installed and doesn't overheat, then this confirms the Audio IC chip itself went bad somewhere in the process.
Replace the Audio IC in this case.
Underfilled Audio IC
If you come across an Audio IC that is underfilled, it is recommended you just replace the IC, as it will be difficult to reball the original and most likely damaged during removal.
An underfilled IC is one that has black "glue" holding down the IC. It is believe that Apple started doing this on certain batches to help cover up the widespread Audio IC Issue.
You see the whole process of removing the Underfilled Audio IC here: https://www.youtube.com/watch?v=jr5lvCFTgoo
Final Testing
- Test Voice Memo App and make sure the app is recording your voice.
- Play back the audio recording and verify you get sound out of both the ear speaker and bottom loud speaker.
- iPhone 7 and 7 Plus has stereo sound, so the ear speaker and bottom speaker will play sound of them at the same time when playing back any Voice Memo recording.
- If you notice the ear speaker sound has static/distortion, check the ear speaker mesh. If it's dirty, it will cause this issue.
- Clean out the ear speaker mesh to solve it
- iPhone 7 and 7 Plus has stereo sound, so the ear speaker and bottom speaker will play sound of them at the same time when playing back any Voice Memo recording.
- Make a phone call and verify the ear speaker has sound and make sure the loud speaker has sound.
If all tests look good, then the issue is solved.
