
More actions
| Toshiba 4610-1NR Not Printing anything on thermal paper Repair | |
|---|---|
| Device | Toshiba 4610-1NR |
| Affects part(s) | Thermal Print Head |
| Needs equipment | Screwdriver (magnetic recommended) |
| Difficulty | ◉◌◌◌ Easy |
| Type | General |
This article is a stub. You can help Repair Wiki grow by expanding it
Problem description
Not Printing anything on thermal paper. Paper comes out blank when printing.

Symptoms
- Not printing onto the paper

Solution
- With the printer upside down remove the interface card by pressing the blue spring-loaded button and pulling up.
- Flip the printer back over and remove the top cover by pressing both grey tabs with your thumbs then sliding the cover up.
- Flip the unit over again and pull the tab back as indicated. This will allow the outer cover to slide up and off.
- Position the unit on its back then remove the two indicated screws (A magnetic tipped screwdriver is highly recommended)

Flip the unit over again and pull the tab back as indicated. This will allow the outer cover to slide up and off. 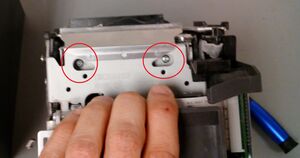
Position the unit on its back then remove the two indicated screws (A magnetic tipped screwdriver is highly recommended) 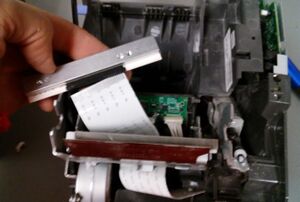
Remove the old thermal head from the ribbon cable connector and swap the new one in place being careful not to bend the corners of the connector. - Remove the old thermal head from the ribbon cable connector and swap the new one in place being careful not to bend the corners of the connector.


YouTube video walkthrough of this process: https://youtu.be/RlbVMICpni4