More actions
| Playstation 4 Fault finding with UART | |
|---|---|
| Type | Troubleshooting/Diagnostics |
| Device(s) | Playstation 4, Playstation 4 Pro, Playstation 4 Slim |
| Difficulty | ◉◉◌◌ Medium |
This article is a stub. You can help Repair Wiki grow by expanding it
Introduction
You can use UART which is a debugging system to get more information about what is happening with the console when it's powered on. However, without patching the firmware on the NOR chip you will only get empty spaces in the serial console. This guide will show you how to enable UART on your board and how to fault find the console using UART. This is especially helpful when trying to fix the pulsing Blue Light of Death.
Requirements
Required tools
- USB-TTL 3.3V converter/UART reader (you can also use a CH341A programmer for that purpose)
- Voltage level is important, if your converter has jumpers make sure they are set to 3.3V
- NOR programmer (CH341A based programmer for instance)
- Adapter for the programmer
- PS4 CUH-12XX/Pro/Slim: adapter for a WSON8 chip
- PS4 CUH-10XX/CUH-11XX: adapter for a 16-PIN SOP chip
- Both are often included with CH341A programmers as a PCB that you can plug into the programmer and solder the chips to
- Soldering iron/Hot air station
- 3.3V power supply/bench power supply *if not removing the NOR chip
Required software
- Software provided with or compatible with your NOR programmer (NeoProgrammer or AsProgrammer for instance)
- Andy_maN's PS4 Wee Tools
Dump and patch the NOR chip
Remove the NOR chip from the board
Remove the NOR chip and put it in your programmer using a WSON8 (CUH-12XX/Pro/Slim) or 16-PIN SOP (CUH-10XX/CUH-11XX) adapter. NOR chip will be located close to the Southbridge.
If you don't want to remove the NOR chip from the board you can use wires and solder corresponding pins from the NOR chip to the adapter board. In this case you don't connect the VCC pin of the NOR chip to the programmer. You need to supply voltage from a separate source by using a 3.3V power supply or a bench power supply.
It might be better not to remove the NOR chip as in some cases you will need to make further modifications to the NOR chip to fault find/fix your console. This will require to desolder the NOR chip multiple times which may cause damage to the board and the IC itself.
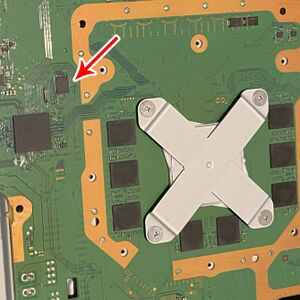 |
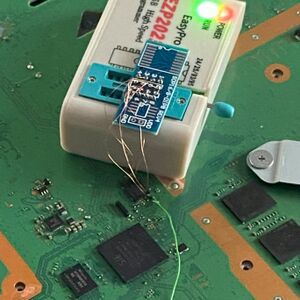 |
|---|
Read the NOR chip and verify the dumps
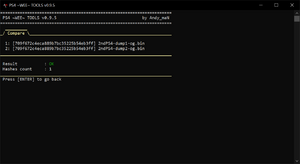
Read the NOR chip using a programmer of your choice at least 2 times and compare your dumps between each other to see if you're getting a consistent read.
Comparing dumps with PS4 Wee Tools:
- Put the dumps in a folder and place that folder at the same location as the PS4 Wee Tools executable
- Run the program and select option "1: File Browser"
- Select your folder from the list
- Use the "c: Compare files in current folder" option
This will verify whether both files are matching each other, if so you're good to go. If the check fails, go back, check your connections and read the chip again. This is especially important as the NOR chip contains per console information, if you lose that your console will be broken forever.
Be sure to name the dumps in a way where you will know which console they came from and what they have inside - for instance "2ndPS4-dump1-og.bin". As all the changes inside PS4 Wee Tools will apply immediately to the file it's good to keep a copy of the original dumps in a different place just in case.
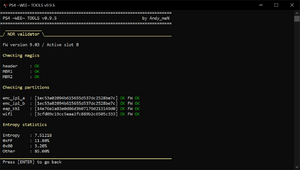
It's also a good practice to verify the integrity of the NOR before going further, this can uncover issues with the console without getting into UART reading.
You can do that inside PS4 Wee Tools by following these steps:
- Copy one of the good dumps to the same folder as the PS4 Wee Tools executable
- Run the program and select option "1: File Browser"
- Select the dump you've just copied
- Select "8: Additional Tools" from the actions menu
- Select "6: Base validation and entropy stats"
This will verify the integrity of the NOR.
Patch the NOR chip dump
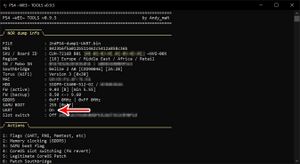
Now we will patch the dump of the NOR chip to enable the UART flag.
- Copy one of the good dumps to the same folder as the PS4 Wee Tools executable
- Run the program and select option "1: File Browser"
- Select the dump you've just copied
- Verify that the program successfully read information from the dump in the NOR info section (if so you have a good dump)
- Select "1: Flags" option from the Action menu
- Enable the UART flag by selecting option "1", you should see "UART was set to [On]"
- Get back to previous menu using "0: Go Back" and then to the file browser using "s - Select Another File"
- Select your dump again and verify that the UART says ON on the NOR info section
- Close the program and rename your dump to indicate that it has the UART enabled - for instance "2ndPS4-dump1-UART.bin"
Write patched dump to the NOR chip
This is the part where you will erase the original contents of the NOR chip.
Make sure you have secured original dumps before flashing the patched dump to the chip!
Solder the NOR chip back to the board*
*This step only applies if you remove the NOR chip from the board.
It's recommended to replace the solder with leaded solder so it's easier to remove the NOR chip again if further flashing is needed.
Connect to UART
You need to solder three wires to the board for the TX/RX signals and GND connection.
The diagram below shows where those points are on different board revisions:
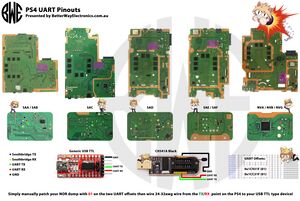 |
|---|
Connect UART TX/RX and GND wires to the corresponding pins on your UART reader.
There are some boards on a diagram that only have UART TX marked, this is expected as for reading you only need to connect TX on one device (PS4) to the RX on another device (UART reader).
Once everything is hooked up, plug the UART reader to your computer, open PS4 Wee Tools and choose option "2: Terminal (UART)". Next, select your reader from the list. You will be presented with an empty console. Now turn on the PS4 and watch the magic happen.
Below are first few lines you will see in UART on a working console upon powering on:
secure loader build: Aug 31 2023 05:21:17 (r10690:release_branches/release_11.000) [800MHz]
AGESA: GL&MO.BDK W9313
951 msec
[BOOT TIME] SAMU: 905 msec: enter
[BOOT TIME] SAMU: 1860 msec: leave
AGESA: MontegoBDK_22.0.5.70908 SAMU: W9313
SIE CONFIDENTIAL
Copyright (C) 2023 Sony Interactive Entertainment Inc.
All Rights Reserved.
Copyright (c) 1992-2012 The FreeBSD Project.
Copyright (c) 1979, 1980, 1983, 1986, 1988, 1989, 1991, 1992, 1993, 1994
The Regents of the University of California. All rights reserved.
FreeBSD is a registered trademark of The FreeBSD Foundation.
UART Errors
ERROR: DCT[#/#] is disabled
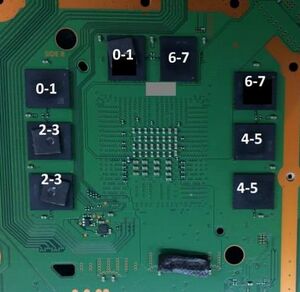
This error indicates a failure of a RAM chip block - a block consists of two RAM modules.
This error will appear if one or both of the RAM chips in a block have issues. DCT error is a communication error between the APU and the RAM modules, so replacing the RAM chips might not solve the issue if there's a connection problem under the APU.
There are 4 RAM blocks: 0/1, 2/3, 4/5, 6/7.
 |
|---|
ERROR: main(####) loadBios -8
This error will show up with the following one:
ERROR: loadBios(####) sceSblSlLoadSelf -8, ####
This means your SYSCON chip is not decrypting the CoreOS, which can be caused by the following issues:
- Faulty RAM chips
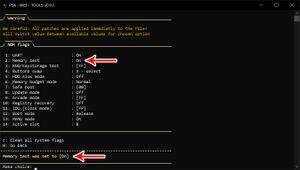
- It's recommended to run a memory test by enabling the memory test flag in PS4 Wee Tools, if there are errors replace all RAM chips. This flag should be disabled when the console is fixed to prevent issues.
 |
 |
|---|
- Corrupted CoreOS
- Can be solved by swapping the active CoreOS slot for the inactive one, which means downgrading the console's firmware. You will need a SYSCON Flasher as well as the other tools required for this guide to perform this.
- See MODDED WARFARE's video tutorial (DIY SYSCON Flasher by Abkarino & EgyCnq , this specific tutorial is for a working console, but the process remains the same)
- See BWE's Tutorial/Walk-through for CoreOS swap (Paid SYSCON Flasher by BWE , video contains a lot of useful information on the issue)
- Can be solved by swapping the active CoreOS slot for the inactive one, which means downgrading the console's firmware. You will need a SYSCON Flasher as well as the other tools required for this guide to perform this.
SAMU Enter/Leave
The output will loop between SAMU Enter and SAMU Leave messages.
SAMU is responsible for managing keys and decryption, APU is likely an issue.
Panic EAP Key Not Available
Can be fixed with PS4 Wee Tools under Additional Tools -> View / Recover EAP key
IDPS Error
No fix
timer_mtk0: <<SB> Timer/WDT> on pci0
If last message from UART is, for example timer_mtk0: <Baikal Timer/WDT> on pci0, this indicates a failure of crystal oscillator, you need to replace it.
