This article is a stub. You can help Repair Wiki grow by expanding it
Problem description
iPhone 13 pro or iPhone 13 pro max with no display output to the screen. The phone will turn on, charge and make sounds like normal but with a black screen. Even though the 13 pro and 13 pro max have different sized motherboards, the circuitry that powers the display is the same.
Symptoms
No image on display while phone is powering on, charging normally and making sounds
Diagnostic Steps
Make sure you first test with a known good screen as this can very easily be a symptom of a bad OLED panel on the display rather than a problem with the motherboard.
After confirming your screen is not the problem, the next step is going to be checking the display FPC connector for any loose pins, broken plastic parts, or missing chunks of the FPC.
Also check if the FPC is bowed out at all, since this is a longer FPC it can very easily get bent outwards and cause the pins to not make a good connection with the screen. If the connector is bowed out then use a tweezers to gently bend it back inwards. Make sure to not use too much pressure when bending the FPC inwards as you can easily damage it further forcing you to replace the FPC.
Next put your multimeter into diode mode and place you red probe on ground then use your black probe to measure each pin on the FPC for variations from the measurements below:
When measuring the pins we are looking for large differences from what is normal. These readings can change a decent amount depending on temperature, your multimeter etc. If you measure the end pins for example (Pin 61, 65, and 62) and they come out as 0.400V then that would be considered normal, but if it reads as "OL" or 0.000V then we know there is a problem. You'll likely find one of these pins to be out of spec but sometimes everything will be reading in spec and you still have issues, lets go through the most common reasons for no image below.
Repair Steps
PNVAR_DISPLAY_VGL
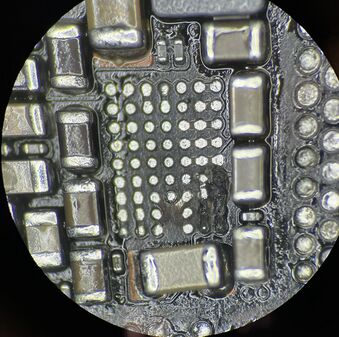
Figure 1. Capacitors C9145 and C9146 next to display IC U9100
One of the most common reasons for no image will be one of the capacitors on PNVAR_DISPLAY_VGL
Usually while measuring the FPC in Diode mode you will find pin 1 to be shorted to ground when it should be reading as OL
This line will go from pin 1 to a single capacitor and then to resistor R11875, on the other side of R11875 there will be two smoothing capacitors that then connect to U9100 which is the display power IC
If this line is shorted you will need to split the sandwich and check the two caps to see if they are shorted.
See Figure 1 for the locations of the two capacitors.
Check if either of them have any physical signs of damage, sucks as cracks in the capacitor, burn marks etc. If one is obviously damaged visibly then you will want to remove it with a blade or pry tool and check the line again to make sure it reads as OL instead of shorted to ground
If the caps have no signs of physical damage then you will need to use a DCPSU and freeze spray or a thermal camera to determine which one heats up when voltage is injected into it.
Set your DCPSU to 1volt 1 amp or something else low, as we don't know what voltage this line is running at we don't want to inject too much voltage into it in order to not cause further damage to the board. place your black probe on ground and your red probe on the side of either capacitor highlighted in red.
You should then look for what heats up first, usually it will be one of the two capacitors, or U9100 itself. If one of the caps heats up then remove it with a blade or other pry tool and measure the pad again to make sure it reads as OL instead of a short to ground. If U9100 heats up you will have to replace it.
U9100 IC is named 338S00616 and found on iPhone 12-16 series
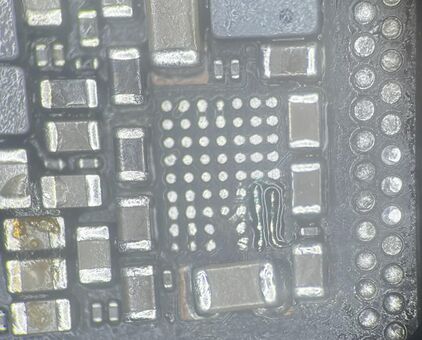
Figure 2. Components highlighted in red are all on the PNVAR_DISPLAY_VSSEL power line
PNVAR_DISPLAY_VSSEL
This is the line that runs on pins 2, 4, and 6 of the display FPC
This line should be OL but will also sometimes become shorted to ground.
See above for the procedure for finding a short and removing it on this line as it will be the same procedure we did for PNVAR_DISPLAY_VGL
This line will also have capacitors under the shield next to the NAND like we see in Figure 2.
If you need to get under this shield use low melt solder around the perimeter and hot air or a grinder and shears to remove just a piece of the shield needed to see the components in question.
Using hot air is not recommended for this shield due to its vicinity to the NAND and risks of floating the NAND.
Display Coils
Figure 3. Display IC coils that will sometimes become disconnected and cause no image
Sometimes one or more of the coils under the shield near the NAND will become disconnected from the board and cause no display
These coils are L9110, L9120, L9130, and L9140, shown in Figure 3.
Use your tweezers to grab each coil and wiggle it a little bit, if the coil is bad it should move around with little to no force. If that's the case the coil will need to be replaced.
If you don't have a iPhone 13 Pro or 13 pro max donor board to pull them from just look for a coil from another iphone with the same size and shape and it should work fine.
When installing a new coil it helps to use low or medium temp solder on the pads of the board where the bad coil was just removed in order to make sure the new coil doesn't need as much heat to solder it in place in order to prevent floating the NAND right next to it
U9100 Display IC
Figure 4. U9100 got badly damaged and shorted PP_VDD_MAIN through L9130 and ended up burning several pads underneath the IC in the processAs we talked about above U9100 can sometimes become internally shorted and would need to be replaced.
Sometimes like shown in Figure 4 if U9100 gets cracked badly or liquid damaged it can burn through some of the board and will require jumpers to fully fix the phone. Usually if the damage is this severe it will cause no power and a 2a or higher power draw before prompt to boot due to PP_VDD_MAIN getting shorted to ground through LX_DPMIC_ELSB and L9130. But sometimes it will burn up evough to sever the connection to PP_VDD_MAIN and just have no image.Figure 5. Jumper wires had to be run to repair the pads that were damaged under U9100
If this is the case then you will need to repair the pads under U9100 as well as replace the IC itself as Shown in Figure 5.
Conclusion
If one of the above common solutions does not fix your issue, make sure to also use your multimeter to probe for shorts around U9100 and under the shield where the Display coils are located.
If you found a problem with one of the above lines or components and fixed it but you still have no image make sure to test again with a known good screen. Especially from catastrophic failures the original screen could have been shorted out itself and needs to be replaced on top of the motherboard needing repairs.