More actions
| Acer Aspire V3-772g Not turning on when plugged in repair | |
|---|---|
| Device | Acer Aspire V3-772g |
| Affects part(s) | Motherboard |
| Needs equipment | multimeter, soldering iron, soldering station |
| Difficulty | ◉◉◉◌ Hard |
| Type | Soldering |
This article is a stub. You can help Repair Wiki grow by expanding it
Problem description
#incomplete

Symptoms
- Not turning on when plugged in to the charger
Solution
Diagnostic Steps
Check voltage on the input MOSFETs
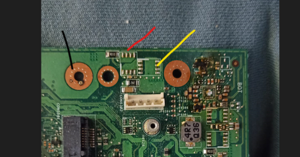
check if there is 19 volt after the 2nd Mosfet, see figure 1 for where to place red probe of your Multimeter. If there is 19 volt then your first 2 mosfets have not failed and the fault lies in deeper in the motherboard, if you don't see 19 v then proceed to the repair steps below.
Measure for a short circuit after the 2nd input MOSFET
Measure the resistance to ground of the output of the 2nd input mosfet. If you read below 100 Ohms then you have a short somewhere, proceed to repair steps below.
Repair Steps
Low or no voltage at the second input MOSFET
- If you measure voltage fluctuations, such as 17v, 20v, 15v, 19v, and so forth, with variations exceeding 1 volt, your power brick may be the likely culprit. In that case, examine the power brick's output port using a multimeter, where the middle pin should register 19v, and the outer metal part should indicate ground.
- If there is no voltage, one of the Mosfets might be blocking it. Check the input of the first Mosfet, as highlighted in yellow in the provided image. If there's no voltage at the first Mosfet's input, ensure your multimeter is correctly configured by testing it on a known working battery.
- If the multimeter is functioning properly, inspect the power jack using the continuity setting. The middle pin, connected to the input of the first Mosfet (yellow), should beep, and the ground should also beep when checked against the copper circle. If there's no beep, inspect the jack or cable for any signs of damage, such as rips or breaks. Similarly, check the ground by comparing the outer shell of the power jack to the copper circle; a beep indicates a secure connection, while no beep suggests a break in the connection. It's crucial to note that the 19v and ground must be separate, and any beep lasting longer than 1 second between ground and 19v should not occur.
Short circuit on the input voltage
Use a variable power supply, set at 19 volts with a 1-amp limit. inject voltage at the location indicated by the red line (output of the 2nd Mosfet, figure 1). The power supply voltage will decrease by 3v, 5v, or 10v based on the resistivity of the short circuit. Lower resistance results in less voltage drop, while higher resistance leads to a greater voltage drop due to the current being capped at 1 amp. If the power supply displays 5v at 1 amp, it indicates that the component drawing power is consuming 5 watts, generating considerable heat depending on its size. Use your finger to identify the overheating components. If you can't locate the issue, increase the amperage limit to 2 amps, intensifying the heat output. Once you identify the fault, remove the component, check if the short is resolved, and replace the component. If the short persists after replacement, continue searching. The component generating the most heat is likely the one causing the short circuit.
