More actions
| AMD GPU Memory Testing Guide | |
|---|---|
| Type | Method |
| Device(s) | AMD GPUs |
| Difficulty | ◉◉◌◌ Medium |
So, your card has all voltages and you have verified that the bios circuit is working as it should but you still have no output from the card. Or there is output but you have artifacts, crashing under load, abnormal behavior etc. Well, you probably have a faulty memory chip and you're at the right place.
-This guide works on AMD cards that do not use HBM memory (i.e. Vega cards or R9 fury cards) since the HBM memory on those is on the same package as the core which makes it near impossible to replace without replacing the core as well.
-Replacing memory chips is a difficult procedure. If you do not have the tools or the experience, you should let an expert do it for you.-
Video tutorial: https://www.youtube.com/watch?v=6n8w4Y8QsdQ
Video tutorial on vertical lines: https://www.youtube.com/watch?v=TxGDzRfYeU8
Memory Channel Labeling
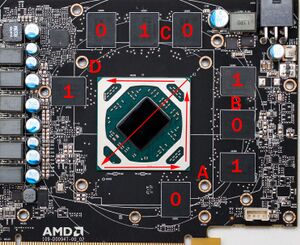
before we start, it is important to understand how memory is labeled on AMD graphics cards. Each 2 memory chips form a memory channel, starting with the letter A and continuing alphabetically until the last channel. Below is memory labeling on Polaris cards:


Unlike Nvidia cards, Memory channels start with chip 0 then chip 1 instead of chip 1 and chip 0.
Sometimes when a memory chip is faulty, the card still outputs a picture but with vertical lines on the screen. It is possible to identify which channel is faulty from the position of the vertical lines as shown in figure 2. This does not mean that both memory chips are faulty.
Testing memory on a card that does not output a picture
-Notice that if the card is NOT detected in both windows AND Linux this means that the problem is likely NOT the memory.-
There is more than one way to test memory on AMD cards, the easiest of which is going to be explained here.
You are going to need:
- Linux Distribution (Arch or Arch based distros is recommended)
- USB flash drive 4GB+
- Memory testing script "dmgg.py" (Google it)
Now, here are the steps to test the memory:
- Install Linux on the USB flash drive or alternatively on a separate partition of your storage
- Download the testing python script
- Boot to Linux and run the following command into the terminal
lspci -v(This will list all the pci devices connected to the computer) - Look for your graphics card in the list and copy the memory address (if the card is not listed then the problem is likely NOT the memory)
- Navigate to the location where the memory testing script is by typing
cd "location of the script"example:cd Desktop - Type
python3 ./"scriptname.py" [memory address] [amount of memory to test in MB no more than 255] [number of memory chips on the card]example:python3 ./dmgg.py c0000000 20 8use sudo at the start of the line if you're using a distro like Manjaro. - The script will run and report where the errors are found. Depending on the version of the script you're using, it can recognize errors on a channel basis or a chip basis (i.e. it will report that there is errors on bank 1-2 indicating channel A or it will tell you error on chip A1)
