Acer Aspire V3-772g Not turning on when plugged in repair: Difference between revisions
From Repair Wiki
(Created page with "{{stub}} {{Repair Guide |Device= |Affects parts= |Needs equipment= |Type= |Difficulty= }} ==Problem description== <nowiki>#</nowiki>incomplete thumb|A Picture of the first 2 Mosfets from the acer aspire v3-772g motherboard (Figure 1) ==Symptoms== *Not turning on when plugged in to the charger ==Solution== Possible Solution(s): check if there is 19 volt after the 2nd Mosfet,...") |
No edit summary |
||
| Line 1: | Line 1: | ||
{{Repair Guide | {{Repair Guide | ||
|Device= | |Device=Acer Aspire V3-772g | ||
|Affects parts= | |Affects parts=Motherboard | ||
|Needs equipment= | |Needs equipment=multimeter, soldering iron, soldering station | ||
|Type= | |Type=Soldering | ||
}} | }} | ||
{{stub}} | |||
==Problem description== | ==Problem description== | ||
<nowiki>#</nowiki>incomplete | <nowiki>#</nowiki>incomplete | ||
Revision as of 17:25, 25 November 2023
| Acer Aspire V3-772g Not turning on when plugged in repair | |
|---|---|
| Device | Acer Aspire V3-772g |
| Affects part(s) | Motherboard |
| Needs equipment | multimeter, soldering iron, soldering station |
| Difficulty | |
| Type | Soldering |
This article is a stub. You can help Repair Wiki grow by expanding it
Problem description
#incomplete
Symptoms
- Not turning on when plugged in to the charger
Solution
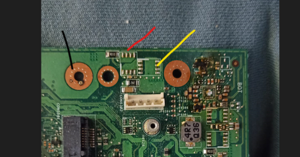
Possible Solution(s): check if there is 19 volt after the 2nd Mosfet, see picture for where to place red probe of your Multimeter
If there is 19 volt then your first 2 mosfets have not failed and the fault lies in deeper in the motherboard, if you don't see 19 v then:
Diagnostic Steps
Check voltage on the input MOSFETs
check if there is 19 volt after the 2nd Mosfet, see figure 1 for where to place red probe of your Multimeter. If there is 19 volt then your first 2 mosfets have not failed and the fault lies in deeper in the motherboard, if you don't see 19 v then proceed to the repair steps below.
Repair Steps
Low or no voltage at the second input MOSFET
- If you see fluctuating voltage like 17v then 20 then 15 then 19 and so on, if the voltage is fluctuating for more than 1 volt, then your power brick may be the culprit, if yes then check the power bricks output port with your multimeter, middle pin is 19v and the outer metal part is ground.
- if you see no voltage then either one of the mosfets may be blocking it, so check the input of the first mosfet, its marked yellow in the picture.
- if you have no voltage at the first mosfets input, then check if your multimeter is set up correctly by measuring a battery, if the multimeter is a known working one then check the power jack with your multimeter set to continuity, the middle pin is 19v so it is connected to the input of the first mosfet (yellow), and the ground is connected to the copper circle, if you dont hear a beep when connecting middle pin to input of the first mosfet, then check jack or cable if its ripped or broken somewhere, the same thing needs to be done to ground, outer shell of the power jack is ground, so check that with the copper circle if you hear a beep that means that its good, if not then the connection is broken. Important note 19v and ground must be seperate, you should never hear a beep longer than 1 second between ground and 19v.
- After checking the top stuff and you still don't see 19 v, even though your power brick has 19 v when you check it separately, then you have a short to ground after the 2nd mosfet which turns on the security system in your power brick cutting your voltage until you unplug and plug it back in from your wall socket. At this point the problem can be anywhere.
