
More actions
Firelemons (talk | contribs) (Created Page) |
Firelemons (talk | contribs) m (Simpler text) |
||
| Line 32: | Line 32: | ||
# Pull the monitor off its stand. It slides out with some effort.[[File:ACER V206HQL Base Removal.jpg|thumb|Simply pull the base down and the screen up]][[File:ACER V206HQL Base Removed.jpg|thumb|The stand after removal]] | # Pull the monitor off its stand. It slides out with some effort.[[File:ACER V206HQL Base Removal.jpg|thumb|Simply pull the base down and the screen up]][[File:ACER V206HQL Base Removed.jpg|thumb|The stand after removal]] | ||
# In the space where the stand was connected, there will be a single screw, remove this screw.[[File:Monitor Screw.jpg|thumb|The screw]] | # In the space where the stand was connected, there will be a single screw, remove this screw.[[File:Monitor Screw.jpg|thumb|The screw]] | ||
# The cover of the monitor is held in by clips. Remove the cover using your pry tool. You can improvise the pry tool with a flathead screwdriver or a butterknife if you're not worried about the case being scratched | # The cover of the monitor is held in by clips. Remove the cover using your pry tool. You can improvise the pry tool with a flathead screwdriver or a butterknife if you're not worried about the case being scratched.[[File:Clip locations.jpg|thumb|This is roughly where the clips holding the case together are]] | ||
## Start at a corner. These are the easiest spots to pull open the case. | ## Start at a corner. These are the easiest spots to pull open the case. | ||
## The back side of the case has teeth that fit in slots in the front. You'll want to angle your pry tool to lift the teeth out of the slots.[[File:Clip orientation.jpg|thumb|The back side of the case is towards the bottom for both images]] | ## The back side of the case has teeth that fit in slots in the front. You'll want to angle your pry tool to lift the teeth out of the slots.[[File:Clip orientation.jpg|thumb|The back side of the case is towards the bottom for both images]] | ||
Revision as of 20:00, 26 January 2026
This article is a stub. You can help Repair Wiki grow by expanding it
| ACER V206HQL Display Issues | |
|---|---|
| Device | ACER V206HQL |
| Affects part(s) | |
| Needs equipment | Pry Tool |
| Difficulty | ◉◌◌◌ Easy |
| Type | |
Problem description
A simple solution to potentially many display problems. Basically a ribbon cable in the monitor is connected vertically and is only held in by friction. Shaking over time loosens the cable which can result in a variety of display problems.

Symptoms
- Vertical red lines appearing in areas displaying black
Solution
We are going to open up the monitor and press the cable into the slot.
Diagnostic Steps
This is an issue caused by the hardware of this monitor. To verify that the issue is caused by the hardware, you could try disconnecting the monitor from any computers and play with the settings using the buttons in the bottom right to see if you can reproduce the display issue. You could try connecting the monitor to another computer and attempt to reproduce the display issue. If you are unable to reproduce the display issue on the second computer the source of the problem will likely not be the monitor.
Repair Steps
- Power the monitor off
- Disconnect all cables
- Pull the monitor off its stand. It slides out with some effort.

Simply pull the base down and the screen up 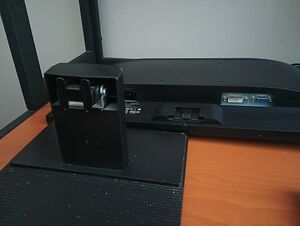
The stand after removal - In the space where the stand was connected, there will be a single screw, remove this screw.
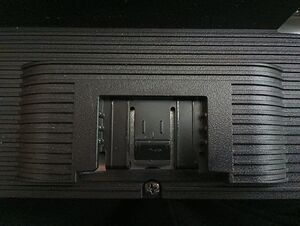
The screw - The cover of the monitor is held in by clips. Remove the cover using your pry tool. You can improvise the pry tool with a flathead screwdriver or a butterknife if you're not worried about the case being scratched.
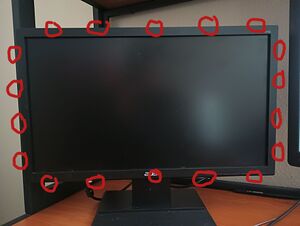
This is roughly where the clips holding the case together are - Start at a corner. These are the easiest spots to pull open the case.
- The back side of the case has teeth that fit in slots in the front. You'll want to angle your pry tool to lift the teeth out of the slots.
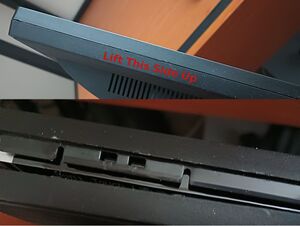
The back side of the case is towards the bottom for both images - From the corner work your way all around the case
- Take the back cover off
- The ribbon cable will have a connection near the top of the monitor. There are very few visible cables. It will be very easy to identify.
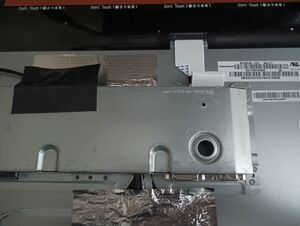
The ribbon cable is in the top right. It is white - If you can see some of the shiny pins of the cable at the connection, it is likely that the cable was loose. Push the connector into the socket to tighten the connection. You might also choose to disconnect the cable and clean out the socket using compressed air before reconnecting it.
- You can plug the power and display cables back in now and turn the monitor on to see if the display issues have been fixed.
- Put the monitor back together. The clips can just be pushed back into place. Remember to put the screw back.
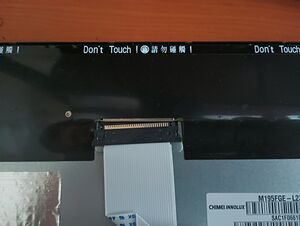
The cable disconnected. You can see the color of the pins here.


