
More actions
IamMyron07 (talk | contribs) (Created page with "{{Explanatory Guide|Type=Soldering|Device=MacBook Pro A1990, MacBook Pro A2141|Difficulty=4. Specialist}}") |
IamMyron07 (talk | contribs) No edit summary |
||
| Line 1: | Line 1: | ||
{{Explanatory Guide|Type=Soldering|Device=MacBook Pro A1990, MacBook Pro A2141|Difficulty=4. Specialist}} | {{Explanatory Guide|Type=Soldering|Device=MacBook Pro A1990, MacBook Pro A2141|Difficulty=4. Specialist}}MacBook storage upgrade or NAND failure requires replacement of onboard NAND flash chips. Since Apple SSD storage is directly soldered to the logic board, new NAND chips must be: | ||
* Correctly programmed | |||
* Properly mapped | |||
* Installed in correct positions | |||
* Restored via DFU after installation | |||
Improper programming or incorrect NAND placement will result in: | |||
* No boot | |||
* Restore failure | |||
* Incorrect storage detection | |||
---- | |||
== Requirements == | |||
* JC Programmer (with JCID Assistant software) | |||
* Compatible blank NAND chips | |||
* Hot air station | |||
* Microscope | |||
* Donor Mac (for DFU restore) | |||
* USB-C cable | |||
---- | |||
== Important Notes Before Starting == | |||
* NAND positions are board-specific (e.g., U9200, U9100, etc.) | |||
* Chips must be installed in the exact mapped positions | |||
* Always mark chips after programming | |||
* Storage size selection must match desired final capacity | |||
---- | |||
= Procedure = | |||
---- | |||
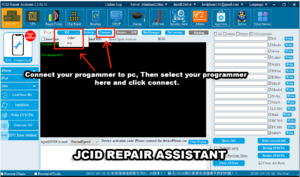
== Step 1 – Connect Programmer == | |||
# Connect JC Programmer to PC | |||
# Open JCID Assistant software[[File:Mac-nand-1.png|center|thumb]] | |||
---- | |||
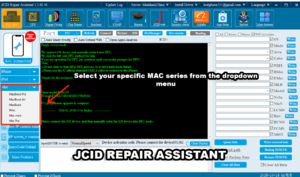
== Step 2 – Select Mac Series == | |||
# From the left-side dropdown menu | |||
# Select the Mac series you are programming for[[File:Mac-nand-2.png|center|thumb]] | |||
---- | |||
== Step 3 – Select Specific Model == | |||
Example: | |||
For this guide, select:<blockquote>MacBook Pro 2019 – A2141</blockquote>Always ensure: | |||
* Model matches exactly[[File:Mac-nand-3.png|center|thumb]] | |||
---- | |||
== Step 4 – Select Storage Capacity == | |||
Choose the storage size you want to program: | |||
* 256GB | |||
* 512GB | |||
* 1TB | |||
* 2TB (if supported) | |||
Example: | |||
* If upgrading to 1TB, select 1TB | |||
* If original device was 512GB, select 512GB | |||
Capacity must match chip configuration. | |||
[[File:Mac-nand-4.png|center|thumb]] | |||
---- | |||
== Step 5 – Program NAND Chips == | |||
# Insert NAND chip into programmer | |||
# Click Write JC Data | |||
# Wait for programming to complete | |||
# Remove chip | |||
⚠️ After programming each chip: | |||
* Mark it clearly (e.g., U9200, U9100, etc.) | |||
* Use a marker or fine-tip Sharpie | |||
* This prevents position mix-up during soldering | |||
Repeat process for all NAND chips. | |||
[[File:Mac-nand-5.png|center|thumb]] | |||
---- | |||
== Step 6 – Install NAND Chips == | |||
# Remove old NAND chips from logic board | |||
# Clean pads thoroughly | |||
# Reball new NAND chips (if required) | |||
# Install each chip in correct labeled position | |||
# Inspect solder joints under microscope | |||
⚠️ Incorrect placement = no boot or restore failure. | |||
---- | |||
== Step 7 – DFU Restore == | |||
After soldering: | |||
# Use a second working Mac | |||
# Connect target Mac via USB-C | |||
# Enter DFU mode | |||
# Open Apple Configurator | |||
# Perform Restore | |||
⚠️ Restore is required to initialize new storage. | |||
---- | |||
== Step 8 – Verification == | |||
After restore completes: | |||
# Boot MacBook | |||
# Complete setup | |||
# Go to: | |||
#* About This Mac → Storage | |||
# Confirm upgraded storage capacity | |||
Example: | |||
* 512GB → now shows 1TB | |||
---- | |||
= Expected Result = | |||
* Mac boots normally | |||
* Storage capacity reflects selected size | |||
* System stable | |||
* No SSD-related errors | |||
* | |||
Latest revision as of 02:56, 22 February 2026
| MacBook NAND Replacement and Programming Guide | |
|---|---|
| Type | Soldering"Soldering" is not in the list (Component, Circuit, Troubleshooting/Diagnostics, Method, Idea/Concept) of allowed values for the "Explanatory Guide Type" property. |
| Device(s) | MacBook Pro A1990, MacBook Pro A2141 |
| Difficulty | ◉◉◉◉ Specialist |
MacBook storage upgrade or NAND failure requires replacement of onboard NAND flash chips. Since Apple SSD storage is directly soldered to the logic board, new NAND chips must be:
- Correctly programmed
- Properly mapped
- Installed in correct positions
- Restored via DFU after installation
Improper programming or incorrect NAND placement will result in:
- No boot
- Restore failure
- Incorrect storage detection
Requirements
- JC Programmer (with JCID Assistant software)
- Compatible blank NAND chips
- Hot air station
- Microscope
- Donor Mac (for DFU restore)
- USB-C cable
Important Notes Before Starting
- NAND positions are board-specific (e.g., U9200, U9100, etc.)
- Chips must be installed in the exact mapped positions
- Always mark chips after programming
- Storage size selection must match desired final capacity
Procedure
Step 1 – Connect Programmer
- Connect JC Programmer to PC
- Open JCID Assistant software

Step 2 – Select Mac Series
- From the left-side dropdown menu
- Select the Mac series you are programming for

Step 3 – Select Specific Model
Example:
For this guide, select:
MacBook Pro 2019 – A2141
Always ensure:
- Model matches exactly


Step 4 – Select Storage Capacity
Choose the storage size you want to program:
- 256GB
- 512GB
- 1TB
- 2TB (if supported)
Example:
- If upgrading to 1TB, select 1TB
- If original device was 512GB, select 512GB
Capacity must match chip configuration.

Step 5 – Program NAND Chips
- Insert NAND chip into programmer
- Click Write JC Data
- Wait for programming to complete
- Remove chip
⚠️ After programming each chip:
- Mark it clearly (e.g., U9200, U9100, etc.)
- Use a marker or fine-tip Sharpie
- This prevents position mix-up during soldering
Repeat process for all NAND chips.

Step 6 – Install NAND Chips
- Remove old NAND chips from logic board
- Clean pads thoroughly
- Reball new NAND chips (if required)
- Install each chip in correct labeled position
- Inspect solder joints under microscope
⚠️ Incorrect placement = no boot or restore failure.
Step 7 – DFU Restore
After soldering:
- Use a second working Mac
- Connect target Mac via USB-C
- Enter DFU mode
- Open Apple Configurator
- Perform Restore
⚠️ Restore is required to initialize new storage.
Step 8 – Verification
After restore completes:
- Boot MacBook
- Complete setup
- Go to:
- About This Mac → Storage
- Confirm upgraded storage capacity
Example:
- 512GB → now shows 1TB
Expected Result
- Mac boots normally
- Storage capacity reflects selected size
- System stable
- No SSD-related errors