More actions
(contactor trial results (batch 1)) |
m (Added Eaton C25BNF240B relay) |
||
| (2 intermediate revisions by one other user not shown) | |||
| Line 39: | Line 39: | ||
== Relay / contactor information == | == Relay / contactor information == | ||
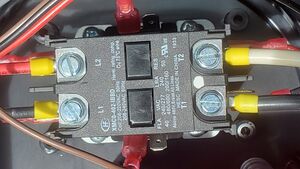
[[File:HCS-contactor.jpg|thumb|Hongfa contactor seen in actual unit]] | [[File:HCS-contactor.jpg|thumb|Hongfa contactor seen in actual unit]] | ||
Two of the fault codes above involve a failed contactor, one of the few mechanical items in the assembly and thus more prone to failure. This part is a 40-Amp, 2-pole contactor with metal mounting plate and screw terminal capability. ([https://www.wolfautomation.com/blog/definite-purpose-contactors-101/ Here's a basic intro into what a contactor is and how it works.]) When terminating wires into it, crimp ferrules onto the wire ends. | Two of the fault codes above involve a failed contactor, one of the few mechanical items in the assembly and thus more prone to failure. This part is a 40-Amp, 2-pole contactor with metal mounting plate and screw terminal capability. ([https://www.wolfautomation.com/blog/definite-purpose-contactors-101/ Here's a basic intro into what a contactor is and how it works.]) | ||
Notes: | |||
* high-current terminals may be label L for Line and T for Terminus (load) but it actually doesn't matter | |||
* When terminating the high-current wires into it, crimp ferrules onto the wire ends. | |||
{| class="wikitable" | {| class="wikitable" | ||
|+contactors for HCS series | |+contactors for HCS series | ||
| Line 54: | Line 60: | ||
|reference, used by OEM | |reference, used by OEM | ||
60mm H x ~80mm L x ~50mm W | 60mm H x ~80mm L x ~50mm W | ||
coil terminal tabs are splayed | coil terminal tabs are splayed | ||
no coil cover | no coil cover | ||
|- | |- | ||
| Line 68: | Line 76: | ||
|[https://www.azettler.com/pdfs/xmc0.pdf data sheet from Zettler] | |[https://www.azettler.com/pdfs/xmc0.pdf data sheet from Zettler] | ||
|[https://www.digikey.com/en/products/detail/american-zettler/XMC0-402ID/14307620 DigiKey] ($10 for qty 1) | |[https://www.digikey.com/en/products/detail/american-zettler/XMC0-402ID/14307620 DigiKey] ($10 for qty 1) | ||
| | | | ||
* same as Zettler above but with "standard thermoset frame" instead of "compact thermo plastic frame" | |||
* visually looks the same | |||
* 66mm H x 84mm L x 50mm W | |||
* manual override exposed | |||
* coil terminal tabs are splayed | |||
* coil is covered | |||
* tested with HCS-40 in Aug 2024, worked fine | |||
|- | |- | ||
|Appli Parts | |Appli Parts | ||
| Line 90: | Line 89: | ||
| | | | ||
|Amazon, $21 | |Amazon, $21 | ||
| | | | ||
* 65mm H x 82mm L x 55mm W | |||
* manual override under plastic cover | |||
* exposed coil | |||
* testing with HCS-40 in Oct 2024 ... | |||
|- | |- | ||
|CGELE | |CGELE | ||
| Line 96: | Line 99: | ||
| | | | ||
|Amazon, $12 | |Amazon, $12 | ||
| | |inspected Aug 2024: | ||
* 65mm H x 88mm L x 53mm W | |||
* slightly larger but still fits easily | |||
* manual override under plastic cover | |||
* exposed coil | |||
* L + T terminals not labeled but doesn't matter | |||
* only 1 vs 2 tabs for each of 4 L+T | |||
|- | |- | ||
|BlueStars | |BlueStars | ||
| Line 102: | Line 112: | ||
| | | | ||
|Amazon, $13 | |Amazon, $13 | ||
| | |inspected Aug 2024: | ||
* 65mm H x 82mm L x 53mm W | |||
* manual override under plastic cover | |||
* exposed coil | |||
* L + T terminals not labeled but doesn't matter | |||
|- | |||
|Homer | |||
|XMC0-402.IBBx (x=C? D?) | |||
| | |||
| | |||
|unknown | |||
|- | |||
|Packard | |||
|C240C | |||
| | |||
| | |||
|unknown | |||
|- | |||
|Eaton | |||
|C25BNF240B | |||
|[https://www.eaton.com/us/en-us/skuPage.C25BNF240B.html specification] | |||
|Ebay, $40+S/H | |||
|From spec sheet: | |||
* 59mm H x 81mm L x 50mm W | |||
|} | |} | ||
== Background / failure modes == | == Background / failure modes == | ||
Common failure modes on these units: | |||
* inadequate strain relief at J1772 plug handle inlet, leading to broken wire inside | |||
* Corrosion at a terminal causing over heating of the wire inside the factory sealed box | * Corrosion at a terminal causing over heating of the wire inside the factory sealed box | ||
* The one circuit board having a failure | * The one circuit board having a failure | ||
| Line 114: | Line 150: | ||
* Pin contacts in the handle just wearing out from cycling-- or arcing on pullout, not supposed to work like that... | * Pin contacts in the handle just wearing out from cycling-- or arcing on pullout, not supposed to work like that... | ||
A common problem with Level 2 EVSEs is that the contactor welds itself closed. Typically not an issue with ClipperCreek though. OpenEVSE chargers like to do this later in life. After taking it apart and filing down the welds on the contact faces, you start just banging your fist on it real hard a couple times. Then power cycling it. That fist induced vibration was usually enough to break those welds, power cycle to clear the error, and get it working again for another month. Before it welded itself again. (will move this to OpenEVSE page later) | A common problem with Level 2 EVSEs in general is that the contactor welds itself closed. Typically not an issue with ClipperCreek though. OpenEVSE chargers like to do this later in life. After taking it apart and filing down the welds on the contact faces, you start just banging your fist on it real hard a couple times. Then power cycling it. That fist induced vibration was usually enough to break those welds, power cycle to clear the error, and get it working again for another month. Before it welded itself again. (will move this to OpenEVSE page later) | ||
== More product photos == | == More product photos == | ||
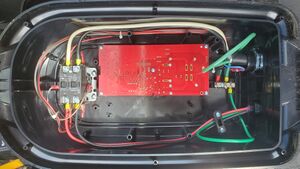
[[File:HCS-inside.jpg|left|thumb|inside view of HCS series EVSe, with back cover removed]] | [[File:HCS-inside.jpg|left|thumb|inside view of HCS series EVSe, with back cover removed]] | ||
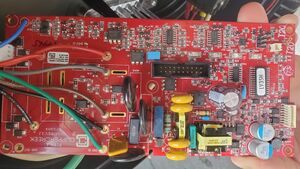
[[File:HCS-circuitboard.jpg|thumb|lone PCBA inside the HCS series EVSE]] | [[File:HCS-circuitboard.jpg|thumb|lone PCBA inside the HCS series EVSE]] | ||
Latest revision as of 19:46, 10 July 2025
This page provides information to support DIY repair of ClipperCreek HCS series EV charging stations, which include the popular HCS-40 and HCS-60 models. ClipperCreek has famously awesome customer support, including hardware swap if the unit is still under warranty. If out of warranty, well here you go.
Clipper Creek HCS user manual (see page 16 for basic LED codes table)
Fault codes from LED status indicators
LED indicators from top to bottom:
- Power / Yellow
- Charging / Green
- Power Fault / Red
- Charging Fault / Red
Note that the number of blinks of the two bottom red LEDs is important.
No indicators on = No power applied to board.
Solid Amber Power = Power applied to board. Charge not requested.
Solid Amber Power and Solid Green Charging = Power applied to board. Charge requested.
Solid Amber Power and Solid Red Power Fault = No ground connection, or high ground resistance
Solid Amber Power and Blinking Charging Fault = CCID fault, Check CCID coil harness
Solid Amber Power and Solid Charging Fault = Pilot error, pilot signal out of spec
Power Fault and Charging Fault Blinking 2 times = Line 1 relay monitor failure
Power Fault and Charging Fault Blinking 3 times = Line 2 / Neutral relay monitor failure
Power Fault and Charging Fault Blinking 4 times = CCID startup self test failure, check CCID coil harness
Power Fault and Charging Fault Blinking 5 times = Internal fault, component damaged or incorrect component installed
Relay / contactor information

Two of the fault codes above involve a failed contactor, one of the few mechanical items in the assembly and thus more prone to failure. This part is a 40-Amp, 2-pole contactor with metal mounting plate and screw terminal capability. (Here's a basic intro into what a contactor is and how it works.)
Notes:
- high-current terminals may be label L for Line and T for Terminus (load) but it actually doesn't matter
- When terminating the high-current wires into it, crimp ferrules onto the wire ends.
| Make | Model | info / link | info / link | suitability / notes |
|---|---|---|---|---|
| Hongfa | XMC0-402.IBBD | website | contactors catalog (PDF) | reference, used by OEM
60mm H x ~80mm L x ~50mm W coil terminal tabs are splayed no coil cover |
| American Zettler | XMC0-402.IBBx (x=C or D, terminal type per data sheet below) | RS Online (out of stock) | DigiKey (high volume only, long lead) | unknown but likely highest quality
has manual button override |
| American Zettler | XMC0-402.ID | data sheet from Zettler | DigiKey ($10 for qty 1) |
|
| Appli Parts | APAC-240240 | Amazon, $21 |
| |
| CGELE | UPC 774297736354 | Amazon, $12 | inspected Aug 2024:
| |
| BlueStars | LTC-2S-40 / 2P-40A-240V | Amazon, $13 | inspected Aug 2024:
| |
| Homer | XMC0-402.IBBx (x=C? D?) | unknown | ||
| Packard | C240C | unknown | ||
| Eaton | C25BNF240B | specification | Ebay, $40+S/H | From spec sheet:
|
Background / failure modes
Common failure modes on these units:
- inadequate strain relief at J1772 plug handle inlet, leading to broken wire inside
- Corrosion at a terminal causing over heating of the wire inside the factory sealed box
- The one circuit board having a failure
- High ground leakage
- microswitch in the handle getting water in it and freezing, immobilizing the microswitch
- Pin contacts in the handle just wearing out from cycling-- or arcing on pullout, not supposed to work like that...
A common problem with Level 2 EVSEs in general is that the contactor welds itself closed. Typically not an issue with ClipperCreek though. OpenEVSE chargers like to do this later in life. After taking it apart and filing down the welds on the contact faces, you start just banging your fist on it real hard a couple times. Then power cycling it. That fist induced vibration was usually enough to break those welds, power cycle to clear the error, and get it working again for another month. Before it welded itself again. (will move this to OpenEVSE page later)
More product photos


