Nintendo Switch Joycons not charging or connecting Repair: Difference between revisions
From Repair Wiki
More actions
No edit summary |
No edit summary |
||
| (One intermediate revision by the same user not shown) | |||
| Line 1: | Line 1: | ||
{{Repair Guide | {{Repair Guide | ||
|Device=Nintendo Switch | |Device=Nintendo Switch | ||
|Affects parts= | |Affects parts=JoyCons | ||
|Needs equipment= | |Needs equipment=multimeter, soldering iron, soldering station | ||
|Type= | |Type=Soldering | ||
|Difficulty= | |Difficulty=3. Hard | ||
}} | }} | ||
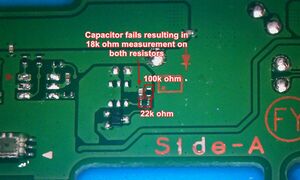
[[File:1200px-Joycon DCDC cap diagram.jpg|thumb|Diagram showing resistor layout (Figure 1) | {{stub}} | ||
[[File:1200px-Joycon DCDC cap diagram.jpg|thumb|Diagram showing resistor layout (Figure 1)]] | |||
==Problem description== | ==Problem description== | ||
Fixing an issue where the Joycons are not charging or connecting/pairing. Joycons aren't charging (on one or both sides), the fan works, and the side-rail is confirmed working. | Fixing an issue where the Joycons are not charging or connecting/pairing. Joycons aren't charging (on one or both sides), the fan works, and the side-rail is confirmed working. | ||
| Line 18: | Line 19: | ||
==Solution== | ==Solution== | ||
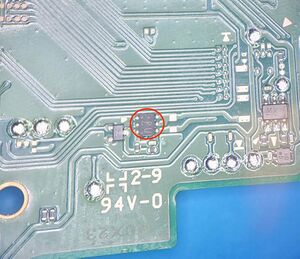
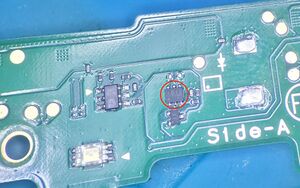
Measure both resistors. 18kohm on both resistors (Figure 1) indicates a failed/shorted capacitor (even if the cap does not test as a short). Resistors should measure 100kohm and 22kohm respectively. | [[File:1041px-Right Joycon DC-DC converter.jpg|thumb|Right Joycon DC-DC converter (Figure 3)]][[File:1200px-Left Joycon DC-DC converter.jpg|thumb|Left Joycon DC-DC converter (Figure 2)]]Measure both resistors. 18kohm on both resistors (Figure 1) indicates a failed/shorted capacitor (even if the cap does not test as a short). Resistors should measure 100kohm and 22kohm respectively. | ||
Measure pin 6 (Figure 2 & 3) in diode mode-- it should read 0. If it reads 0.6v drop this reinforces the capacitor failure. | Measure pin 6 (Figure 2 & 3) in diode mode-- it should read 0. If it reads 0.6v drop this reinforces the capacitor failure. | ||
If resistors check out, the DC-DC component may need replacing | If resistors check out, the DC-DC component may need replacing | ||
Latest revision as of 16:44, 13 January 2024
| Nintendo Switch Joycons not charging or connecting Repair | |
|---|---|
| Device | Nintendo Switch |
| Affects part(s) | JoyCons |
| Needs equipment | multimeter, soldering iron, soldering station |
| Difficulty | ◉◉◉◌ Hard |
| Type | Soldering |
This article is a stub. You can help Repair Wiki grow by expanding it

Problem description
Fixing an issue where the Joycons are not charging or connecting/pairing. Joycons aren't charging (on one or both sides), the fan works, and the side-rail is confirmed working.
Symptoms
- Joycons not charging or connecting/pairing
- Joycons aren't charging (on one or both sides)
- The fan works
- The side-rail is confirmed working.
Solution


Measure both resistors. 18kohm on both resistors (Figure 1) indicates a failed/shorted capacitor (even if the cap does not test as a short). Resistors should measure 100kohm and 22kohm respectively.
Measure pin 6 (Figure 2 & 3) in diode mode-- it should read 0. If it reads 0.6v drop this reinforces the capacitor failure.
If resistors check out, the DC-DC component may need replacing
