|
|
| Line 1: |
Line 1: |
| {{stub}} | | {{stub}} |
| {{Repair Guide | | {{Device page |
| |Device=Playstation 3 Slim, Playstation 3 CECH‑L04
| | |Manufacturer=Muse|Device type=EEG Headband}} |
| |Affects parts=Motherboard | |
| |Needs equipment=Soldering Iron, USB-TTL Device | |
| |Type=
| |
| |Difficulty=2. Medium
| |
| }} | |
| == Problem description ==
| |
| <!--
| |
| Provide a concise description of the issue here. Be as specific as possible to help readers quickly determine whether or not this is the exact problem they are facing.
| |
| -->
| |
|
| |
|
| The Syscon when detecting a problem with a component on the motherboard creates a Error Log.
| | == Guides == |
| | {{List Guides}} |
|
| |
|
| Using UART to communicate with the console we can request the Syscon to show us the Error logs stored in the console.
| | == Device pictures == |
| | <gallery showthumbnails="1"> |
| | File:Example device pictures.jpg |
| | </gallery> |
|
| |
|
| These errors can then help us identifying what's wrong with the console.
| | == PCB pictures == |
| [[File:USB-TTL Device.jpg|thumb|Example of a USB-TTL Device]]
| | <gallery showthumbnails="1"> |
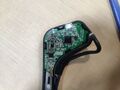
| | File:Muse 2016 Mainboard.jpg|Mainboard |
| | File:Muse 2016 Battery Board (Take 2).jpg|Battery Board |
| | </gallery> |
|
| |
|
| == Required tools == | | == Reference measurements (also schematics if available) == |
| <!-- | | <gallery showthumbnails="1"> |
| Detail all measurable or observable symptoms in this section.
| | File:Example measurement pictures.jpg |
| -->
| | </gallery> |
|
| |
|
| In order to connect to the PS3 you will need a USB-TTL device doesn't really matter which one.
| | == More Information/External Sources == |
|
| |
|
| You will also need a few pieces of wires to connect the device to the console.
| | * Battery is a 3.7v lithium polymer 552030 20mm x 30mm x 5mm (Ref: https://fatseas.com/2017/06/14/my-muse-headset-has-a-dead-battery/, https://fatseas.com/2017/06/30/i-replaced-my-muse-headband-battery/) |
| | |
| You will need a soldering iron.
| |
| | |
| == Connecting the USB-TTL to the console ==
| |
| <!--
| |
| If the issue has a single, specific solution, provide it in this section and delete the sub-headers below. Otherwise, if there are multiple potential causes for the problem, outline the process of identifying the root cause and offer corresponding solutions below.
| |
| | |
| -->In order to connect the PS3 to your device you will need to solder 3 wires to the motherboard RX/TX and GND.
| |
| | |
| Bellow are the location of the points where we need to solder our wires, the locations vary from board to board.
| |
| | |
| [[File:Models A-E (COK-00X).jpg|center|thumb|Models A-E (COK-00X)]]
| |
| [[File:Model G (SEM-001).jpg|center|thumb|Model G (SEM-001).]]
| |
| [[File:Models H-K (DIA-00X).jpg|center|thumb|Models H-K (DIA-00X)]]
| |
| [[File:Models L-Q (VER-001).jpg|center|thumb|Models L-Q (VER-001)]]
| |
| [[File:Model 20xx (DYN-001).jpg|center|thumb|Model 20xx (DYN-001)]]
| |
| [[File:All SS Models (MSX-001, MPX-001, NPX-001, PPX-001, PQX-001, RTX-001, & REX-001).jpg|center|thumb|All Super Slim Models]]
| |
| Follow the image above solder your 3 wires to the test pads and connect them like the image above.
| |
| | |
| '''Remember RX goes to TX and TX to RX.'''
| |
| | |
| === Connecting the console to the PC ===
| |
| | |
| In order to pull the errors from the console we will need a program to communicate with the console, in this guide we will use SysconReader [https://github.com/db260179/ps3syscon/tree/master/Windows/SysconReader]
| |
| | |
| Download and install the software above.
| |
| | |
| Connect your USB-TTL device to the computer, plug in the power supply of to the console and plug it in but dont turn the console on.
| |
| | |
| Next open the program and select the COM port where your USB-TTL is connected to.
| |
| | |
| Then there 2 types of syscon on PS3 Consoles Mullion (CXR) and Sherwood (SW) select the correct one according to the images bellow.
| |
| | |
| [[File:Mullion syscons.jpg|center|thumb|346x346px|Mullion Syscons]]
| |
| | |
| [[File:Sherwood syscons.jpg|center|thumb|379x379px|Sherwood Syscons]]
| |
| | |
| After selecting the right type of syscon click on Start.
| |
| | |
| After a click on AUTH and wait for a green text saying sucess if you get fail multiple times keep trying and if still falling check your wiring.
| |
| | |
| After AUTH sucess click on Get Error Codes and wait for the process to finish.
| |
| | |
| Expected output:
| |
| [[File:PS3 Syscon expected output.png|center|thumb|PS3 Syscon expected output]]
| |
| | |
| === What to do with the Codes? ===
| |
| Unfortunately Sony doesn't tell us what every error means, but the repair community as managed to associate many errors with symptoms.
| |
| | |
| The most up to date database of syscon errors is on PS3 Dev Wiki [https://www.psdevwiki.com/ps3/Syscon_Error_Codes]
| |


.jpg)