(Created page with "{{stub}} {{Repair Guide |Device= |Affects parts= |Needs equipment= |Type= |Difficulty= }} ==Problem description== Provide a concise description of the issue here. Be as specific as possible to help readers quickly determine whether or not this is the exact problem they are facing. thumb|Example image (Figure 1) -- No image yet. Help expand this page by uploading it! ==Symptoms== Detail all measurable or observable symptoms in this section...") |
(removing stub) |
||
| (4 intermediate revisions by the same user not shown) | |||
| Line 1: | Line 1: | ||
{{Repair Guide | {{Repair Guide | ||
|Device= | |Device=Epson ELPDC21 | ||
|Affects parts= | |Affects parts=Connectors | ||
|Needs equipment= | |Needs equipment=Screwdrivers | ||
|Type= | |Type=Teardown | ||
|Difficulty= | |Difficulty=2. Medium | ||
}} | }} | ||
==Problem description== | ==Problem description== | ||
When the main board of the document camera cannot talk to the camera head, it will not finish its startup sequence. | |||
==Symptoms== | ==Symptoms== | ||
Detail all measurable or observable symptoms in this section. | Detail all measurable or observable symptoms in this section. | ||
* | *After pressing the power button the power led correctly starts flashing, but | ||
* | *The flashing never stops, and the document camera doesn't start functioning | ||
==Solution== | ==Solution== | ||
===Diagnostic/Repair Steps=== | |||
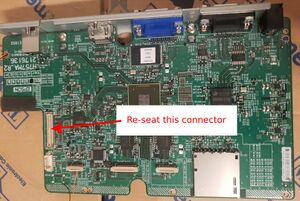
[[File:Epson_elpdc21_document_camera_reseat_this_connector_first.jpg|thumb|Figure 1 - The first connector to check]] | |||
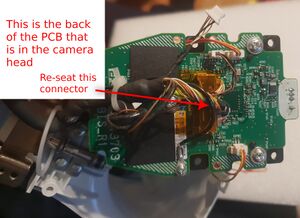
[[File:Epson_elpdc21_document_camera_reseat_this_connector.jpg|thumb|Figure 2 - The second connector to check]] | |||
The most likely reason this can happen is that one of the connectors gets disconnected, either on the main board, or in the camera head. The connector in the camera head is more likely to become disconnected, however as a first step it's recommended to check the connector at the main board, because it's easier to disassemble the base of the camera. | |||
Diagnostics and repair involves disassembling the device, and re-seating the connector. | |||
# Disassemble the base of the device | |||
# Check and re-seat the connector on Figure 1 | |||
# If the device still doesn't turn on, then: | |||
# Re-assemble the base | |||
# Disassemble the camera head (this is more difficult) | |||
# Check and re-seat the connector on Figure 2 | |||
# If the device still doesn't turn on, then it may have a more complicated fault | |||
Latest revision as of 15:59, 14 January 2024
| Epson ELPDC21 Not turning on, led blinking | |
|---|---|
| Device | Epson ELPDC21 |
| Affects part(s) | Connectors |
| Needs equipment | Screwdrivers |
| Difficulty | ◉◉◌◌ Medium |
| Type | Teardown |
Problem description
When the main board of the document camera cannot talk to the camera head, it will not finish its startup sequence.
Symptoms
Detail all measurable or observable symptoms in this section.
- After pressing the power button the power led correctly starts flashing, but
- The flashing never stops, and the document camera doesn't start functioning
Solution
Diagnostic/Repair Steps
The most likely reason this can happen is that one of the connectors gets disconnected, either on the main board, or in the camera head. The connector in the camera head is more likely to become disconnected, however as a first step it's recommended to check the connector at the main board, because it's easier to disassemble the base of the camera.
Diagnostics and repair involves disassembling the device, and re-seating the connector.
- Disassemble the base of the device
- Check and re-seat the connector on Figure 1
- If the device still doesn't turn on, then:
- Re-assemble the base
- Disassemble the camera head (this is more difficult)
- Check and re-seat the connector on Figure 2
- If the device still doesn't turn on, then it may have a more complicated fault

