No edit summary |
|||
| Line 1: | Line 1: | ||
{{Repair Guide | {{Repair Guide | ||
|Device=MacBook Pro | |Device=MacBook Pro 13", 15", 16" 2016-2020 | ||
|Affects parts= | |Affects parts=Display assembly | ||
|Needs equipment= | |Needs equipment=soldering iron, replacement glue stripes, replacement LCD Flex cable, 0.02MM solder wire, heating mat | ||
|Type=Soldering | |Type=Soldering, Disassembly, Nightmare | ||
|Difficulty=4. Specialist | |Difficulty=4. Specialist | ||
}} | }} | ||
Revision as of 12:15, 24 January 2024
| DustGate repair | |
|---|---|
| Device | MacBook Pro 13" , 15" , 16" 2016-2020 |
| Affects part(s) | Display assembly |
| Needs equipment | soldering iron, replacement glue stripes, replacement LCD Flex cable, 0.02MM solder wire, heating mat |
| Difficulty | ◉◉◉◉ Specialist |
| Type | Soldering, Disassembly"Disassembly" is not in the list (Soldering, Teardown, Part replacement, Cleaning, Software, BGA, General) of allowed values for the "Repair Guide type" property., Nightmare"Nightmare" is not in the list (Soldering, Teardown, Part replacement, Cleaning, Software, BGA, General) of allowed values for the "Repair Guide type" property. |
This article is a stub. You can help Repair Wiki grow by expanding it
Problem description
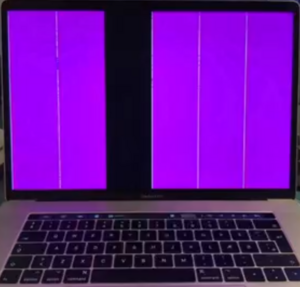
dust pinches hole through flex data cable between Tcon and LCD. this causes different types of malfunction, mostly with 6 even vertical bars (each corresponds image block of the screen).
Symptoms
- 6 pink vertical bars on the screen, might change or flicker with different lid angle
- black screen with backlight only (rare, in most cases that would be a cracked screen edge)
The main symptom is the bar pattern. horizontal-lines are caused by damaged LCD / Traces on glass.
Solution
Confirm the issue with a different screen or external monitor, then refer to the (upcoming) Dustgate Repair page.
To repair this issue, you must either repair a broken trace (remove the logoboard and cable fixture to access the edge part of the cable) or replace both cables. If the cable looks good, inspect the LCD under the logoboard for broken or corroded traces between the orange cable and image decoders on the glass.
All cables have the same pinout; however, 15 and 16-inch ones have a longer grounding pin. Cables are very prone to break, so do not bend them near the soldering area and put UV glue on the other side, just like it was done in manufacturing.
After flex replacement, it is normal to have a flickering screen for 10-20 hours of display operation. The suspected reason is a display synchronization problem due to slightly different impedance in a new cable/confused MCU due to a broken trace in the cable. It goes away by itself, also happens after TCON firmware reflashing.
This type of repair requires lots of practice and advanced repair skills to perform.
