This article is a stub. You can help Repair Wiki grow by expanding it
Problem description
Some iPads using the CD3217 USB-C controller IC can develop a no charge, no boot, or low voltage negotiation issue. This typically happens after liquid damage or a power surge. Replacing the CD3217 alone doesn’t fix the issue, because the connected ROM IC is often corrupted or damaged.
⚠️ Important: The CD3217 and ROM chip are not paired, but the ROM stores crucial firmware/data required for CD3217 functionality. If the CD3217 fails, it often damages the ROM, and a new CD3217 will not function unless the ROM is replaced or programmed.
Symptom 1 (Fig. 1) -- iPad Not charging and stuck at 5.00V and 0.744A
Symptoms
Symptom 1 (Figure 1)
USB-C power meter shows only 5V — no voltage negotiation (should be 15)
Symptom 2
New CD3217 IC installed but still no charge
Solution
Replace both CD3217 and ROM IC (See Fig 2)
Program a new ROM using JC V1S Pro
Install both chips
Charging will be restored
Diagnostic Steps
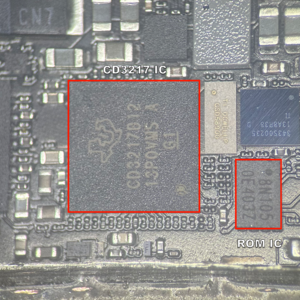
Fig. 2 -- The CD3217 IC and the Ace ROM ICVisual Inspection
Look for signs of corrosion/Look for shorts around the CD3217 and ROM area
Check for burnt ROM chips or CD3217
Voltage Testing
Use USB-C power meter or bench power supply
Plug in USB-C and check if iPad negotiates proper voltage
5V = error (bad CD3217/ROM or negotiation issue)
Repair Steps
Step 1: Remove Damaged CD3217 & ROM
Desolder both the faulty CD3217 and the adjacent ROM IC
Clean area properly, ensure all pads are intact and usable
Step 2: Prepare New CD3217 + New ROM IC
Use a fresh CD3217 IC from a trusted supplier
Get a blank ACE SPI Flash chip — compatible size for your board
Step 3: Program the ROM Chip
Fig. 3 -- Match the dot on the ROM chip to the triangle on the JCV1S Pro ROM Read/Write Module.
Option A: JC V1S Pro Server
Use JC V1S Pro with their ROM Read/Write Module
Install and align the ROM chip to the triangle on the programmer. (See Fig. 3)
Step 1] Press check on the programmer and it will detect the SPI chip.
Step 2] Select 'Open' then 'ServerFile' (Note: Your V1S Pro needs to be connected to WiFi for this to work)
Step 3] Choose corresponding file required for the model of your iPad.
Step 4] Click Write and Confirm write
Option B: Donor Board ROM Dump
Pull a working ROM chip from a donor board of the same model
Use JC V1S Pro to read and save the dump locally
Click write and select the file and flash the dump onto your blank ROM IC
Store dumps in a labeled folder (example: iPad Pro 11 2nd Gen CD3217 ROM.bin)
Fig.4 -- iPad Successfully charging after CD3217 and Ace ROM replacement
Step 4: Reball & Install CD3217
Reball and solder new CD3217 in place
Ensure all surrounding passives are intact
Step 5: Install Programmed ROM
Solder the newly programmed ROM chip in original location
Clean with IPA and inspect joints under microscope
Verify Charging by plugging in a charger that supports 15V charging (See Fig. 4)