Your IP address will be publicly visible if you make any edits.
IPad 10 Backlight not working
From Repair Wiki
More actions
Revision as of 18:22, 28 May 2025 by Samhext(talk | contribs)(added new image with diode mode readings for LCD FPC and a new diagnostic step to test the pins on the connector before needing to remove shield)
This article is a stub. You can help Repair Wiki grow by expanding it
Problem description
iPad 10 has no backlight from LCD. iPad will turn on and work normally but LCD will only be visible while shining a light on it.
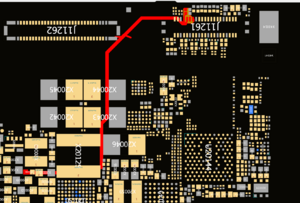
Figure 1. iPad 10 motherboard with main LCD FPC and surrounding components circled in blue, and the general area where the backlight filter, caps, and diodes circled in red
Symptoms
While turning iPad on, shine a light on the middle of the screen and the Apple logo will be faint but visible.
iPad turns on, charges, makes noise, and otherwise works normally but with no backlight
Diagnostic Steps
First test with a known good LCD as the LCD itself can be the cause of backlight issues.
If you don't have an LCD that is known to be working normally, and you only have access to new ones, make sure to try several as you can very easily run into a batch of bad LCD's
Do a visual check of the LCD FPC connector circled in blue in Figure 1. Make sure the FPC is not damaged, and that there are no burnt components or anything knocked off from pry damage during disassembly
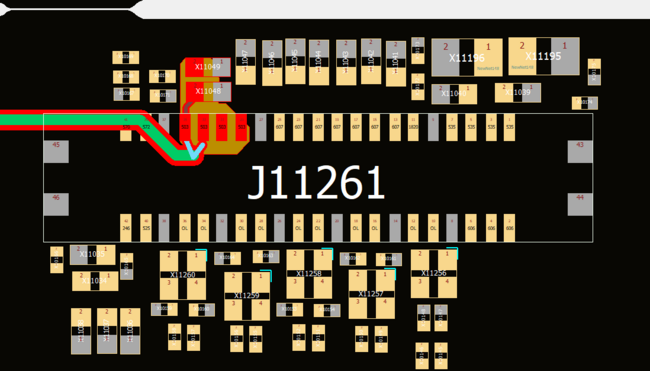
Set your multimeter to diode mode and place your red probe on ground and use the black probe to check each pin of the LCD FPC connector. Pay close attention to the highlighted pins in figure 2. If those pins are reading as OL or a reading that is a very large difference from 0.503v, you more than likely have a blown backlight filter.
Figure 2. iPad 10 LCD FPC connector with 4 pins going to the backlight circuit highlighted as well as diode mode readings for the rest of the FPCKeep in mind that sometimes you can have a diode mode reading on these pins that will seem normal, but you can still have a blown filter or another issue gone over in the below repair steps below
Use a grinder and/or shears to cut out an area of the shield circled in red from Figure 1. Alternatively use low melt solder on the edges of the shield to make it easier to pull off and then use hot air to remove the entire shield from the board. Under this shield you will find the main filter (fuse) for the backlight, as well as capacitors, two diodes, and one of the power management IC's which powers the backlight circuit.
Repair Steps
Figure 3. iPad 10 backlight filter circled in blue, backlight circuit diodes circled in green, power management IC that powers the backlight circuit circled in pink, and smoothing capacitors for the backlight circuit circled in orange
Backlight Filter (Fuse) Circled in blue on Figure 3
This is the most common reason why the backlight will not work in an iPad 10, it usually will get blown from connecting or disconnecting an LCD while the battery is still connected to the iPad.
You will usually find it burnt or charred which makes it easy to determine that it's bad and will need to be replaced.
If it's not visually damaged, take out your multimeter in diode mode, place one probe on each side of it and make sure it has continuity from one side to the other. If you get an OL reading that means it will need to be replaced.
You can use an iPhone 6s backlight filter as a replacement if you cannot source the exact filter or a donor board to pull it from
Sometimes if the filter gets burnt or charred it will damage one or both of the pads that it is soldered to.
If the pad on the side of the filter closest to the PMIC (Circled in pink on figure 3) is damaged you can attach it to or run a jumper from the capacitor right next to it. In Figure 3 any of the pads selected that are red on one side will be the same line and a good place to run a jumper from.
Figure 4. This is the trace that runs from the opposite side of the backlight filter to the LCD FPC. if the pad on this line is damaged you'll either need to dig through the board to attach a jumper to it or run a long jumper from one of the areas it connects to near the LCD FPCif the opposite side of the filter has a damaged pad then you can either dig through the board to find and run a jumper from the trace or run a longer jumper to one of the 4 pins on the LCD FPC that the trace runs to, or one of the two capacitors above those pins. See Figure 4 for a view of there the trace runs to and the parts of the board you can run a jumper from
Backlight Diodes Circled in green on Figure 3
These will sometimes fail and stop the backlight from working
They are glass diodes so check for any cracks in them as that will be a good visible sign that they have failed.
Use your multimeter in diode mode to probe each side of the diodes, make sure that they have near 0.00V continuity when your red probe is on the side closest to the PMIC and black probe on the opposite side of diode. Then swap the red and black probes and verify that you high OL or a very high reading
If either you get a similar reading on both sides of the diode, OL where you're supposed to have continuity, or a low reading where you should be getting OL or a high reading, replace the diode(s)
Backlight Capacitors Circled in orange on Figure 3
These will sometimes become shorted on their own or after finding a burnt filter.
With your multimeter in diode mode put your red probe on ground and your black probe on either side of one of the capacitors. If you find that you have a short to ground on both sides of a capacitor you then need to determine which cap is faulty.
With either freeze spray or a thermal camera, find the short by injecting 1v/1a into the power line and watching which capacitor heats up. If you're unsure of where to inject voltage, you can place your DCPSU probe on the red side of any of the capacitors circled orange in figure 2.
Remove the capacitor that is heating up when injecting voltage. Since these are smoothing capacitors they do not need to be replaced as the rest of the caps on that power rail will pick up the slack of the missing one.
PMIC Circled pin in Figure 3
This very rarely fails but it is possible for it to fail.
You can probe for shorts on the capacitors around the IC like we did to find if one of the backlight caps was shorted above and if you find multiple caps that are shorted to ground around the IC, try and replace it to see if the shorts go away and your backlight is restored.
Alternatively if you've tried all other solutions above and you for sure have a good FPC, LCD, Filter, diodes, and no shorted backlight caps, replace the PMIC to hopefully get the backlight functional again.