
More actions
| Playstation 3 Slim Error 8002F1F9 | |
|---|---|
| Device | Playstation 3 Slim |
| Affects part(s) | Motherboard |
| Needs equipment | Soldering Iron, Hot Air Station, Microscope |
| Difficulty | ◉◉◉◌ Hard |
| Type | Soldering |
This article is a stub. You can help Repair Wiki grow by expanding it
Problem description
This error happens when the console is unable to detect the Wifi/Bluetooth Module.

Symptoms
- You try to update the console firmware and get error 8002F1F9.
- You can't use Wifi or Bluetooth.
Solution
This is issue is caused by a design flaw the chip is always providing power to the Wifi module even with the console on standby might be bad quality chips they used or design fault.
The solution is to replace the chip or do a small modification to the circuit by installing a different power ic.
Diagnostic Steps
On the Playstation 3 Slim this problem is usually caused by a faulty J7L chip where it fails to output 1.8V.
Bellow are the required voltages for the Chip to work, start my measuring the voltage input of the chip it must have 5V and 3.3V with the console on standby if these 2 voltages are present measure the output on the coil it must be 1.8V.

Repair Steps
There are 2 ways to repair this fault, you can source the same chip from a donor board and replace it but keep in mind that with time it may fail again, or we can do a small modification by installing a AMS1117-1.8
Installing the same chip
If you choose to install the same chip the process is fairly simple.
Use your hot air station to desolder the old IC clean pads on the motherboard add new solder and solder the new chip.
Installing the AMS1117-1.8
Due to the size of the AMS1117-1.8 we wont be able to install it in the position of where the J7L is located.
- Use your Hot air station to remove the J7L chip, you can also remove the big coil on the 1.8v line if you want.
- The AMS1117-1.8 has 4 contact points, we need to isolate the contact point that is alone to do that simply place a small piece of kapton tape under the ic.
- Solder the AMS1117-1.8 like the image bellow
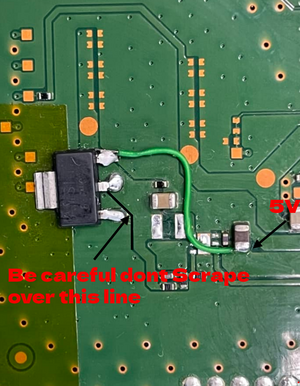
AMS1117-1.8 Solder location

After Soldering the new AMS1117-1.8 make sure you have 1.8V on the middle pin.
This solution may seem more complex, but it is better since the AMS1117 is a more reliable IC compared to the J7L originally installed.
Final Testing
Reassemble the console and make sure you are able to update the console without any issues.
Make sure you can sync a controller using Bluetooth.
Connect your console to the internet using Wifi.