Your IP address will be publicly visible if you make any edits.
IPad Air 4 Not Reading Touch
From Repair Wiki
More actions
Revision as of 18:31, 22 May 2025 by Samhext(talk | contribs)(Created page with "{{stub}} {{Repair Guide |Device= |Affects parts= |Needs equipment= |Type= |Difficulty= }} == Problem description == <!-- Provide a concise description of the issue here. Be as specific as possible to help readers quickly determine whether or not this is the exact problem they are facing. --> iPad Air 4 is booting up and working normally aside from not reading touch File:Jpcba kF.jpg|thumb|Figure 1. J shaped cutout in the shield covering touch IC's and other compon...")
This article is a stub. You can help Repair Wiki grow by expanding it
IPad Air 4 Not Reading Touch
Device
Affects part(s)
Needs equipment
Difficulty
Type
Problem description
iPad Air 4 is booting up and working normally aside from not reading touch
Figure 1. J shaped cutout in the shield covering touch IC's and other components
Symptoms
Not reading touch
Diagnostic Steps
The first thing you'll want to try is a known good screen to make sure it's not a display issue. Remember to use a known good screen that had working touch on another ipad as brand new displays can pretty commonly have issues.
Do a physical inspection of the middle display FPC connector to make sure nothing is broken on it and all pins are sturdy.
Peel the black tape covering the shields in the middle of the board. This should uncover a J-shaped cutout in the shield like in Figure 1. Set your multimeter to diode mode and with the red probe on ground, use the black probe to check both sides of all the capacitors in the large horizontal opening of the "J"
You'll likely find that one or more of the capacitors in the top left or middle of the large horizontal opening are shorted to ground on both sides.
Repair Steps
There are two IC's above the capacitors we just checked which control touch, if one of the capacitors are shorted to ground on one of the power lines for these IC's then the touch circuit will not work and you'll be left with an iPad that has no touch even with a known good screen. You now need to find the shorted capacitor and remove it.
In order to find the shorted capacitor you'll need to use a DCPSU to inject voltage into the line and using a thermal camera or freeze spray we can determine which cap is heating up. Since most boardview software does not list the names of the power rails for the iPad Air 4 we don't know what kind of voltage these lines run at so we can be safe by setting DCPSU to 1v/1a which will be a safe amount of power to inject in almost any iPad power rail.
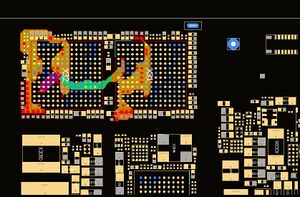
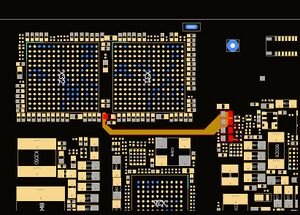
Figure 2. Boardview of the power rail for the touch circuit that is shortedFigure 3. Boardview of the opposite side of filter on shorted power rail for touch circuit showing a rank of caps under the shield next to touch IC'sBoardview does at least tell us where each power rail goes to and in this case we find that the power rail mainly connects to a lot of caps around the perimeter or the two touch IC's like in Figure 2, however we also see that through a filter it also connects to another rank of caps under the shield next to where we are probing as you can see in Figure 3.
With your DCPSU set to 1v/1a like we did above, place your black probe on ground and your red probe on the non-ground side of one of the capacitors for the power rail that is shorted. Using a thermal camera or freeze spray watch for where the board starts heating up.
You may get lucky and find one of the exposed capacitors heating up, if this happens remove the shorted cap and test to see if your touch is working.
if the heat seems to come from the caps under the neighboring shield then you'll need to either remove the whole shield or use a grinder and/or cutting tool to expose the rank of caps. In my case I used a grinder to cut a small line in the corner of the shield and then a snips to cut and peel back the rest of the area like in Figure 4.
Now inject voltage again and see if one of the caps we just exposed are heating up. In my case I found one to be heating up which we can see in Figure 5
Remove the faulty cap and test to see if touch is working. Since the caps on this power rail are smoothing capacitors and there are a lot more on the same power rail we don't have to worry about replacing it.