
More actions
This article is a stub. You can help Repair Wiki grow by expanding it
| Macbook Air A3113 Trackpad and or Keyboard not working | |
|---|---|
| Device | |
| Affects part(s) | |
| Needs equipment | |
| Difficulty | |
| Type | |
Problem description
Macbook air A3113 will turn on and work normally aside from the trackpad and/or keyboard not working at all.

Symptoms
- Trackpad not working
- Keyboard not working
- Macbook will turn on otherwise and work normally
Solution
Just like on many other Macbook models the keyboard circuit is tied to the trackpad and if the trackpad is not working it will likely cause the keyboard to not function either. Commonly you'll find a part of the trackpad that will be corroded and/or shorted to ground like in Figure 1. In order to fix it you'll either have to find and remove the corrosion and any shorted components or replace the trackpad itself.

- First you'll have to unplug the battery, trackpad flex, and take out the 10 screws holding the trackpad in place. When you take the trackpad out be mindful of the washers around each screw terminal as they are easy to lose. See Figure 2 below to know where the battery, trackpad flex and 10 screws are located.
- Next you have two options, replace the trackpad, or try to fix the trackpad.
- If you decide to replace the trackpad, make sure to transfer the washers from the old trackpad along with the trackpad flex cable if your replacement did not come with a new one
- If you have decided to fix the trackpad then you'll want to start by doing a visual inspection of the underside of the trackpad. Look for any corrosion or caps that look burnt or split etc.
- If you're lucky the damage will be pretty obvious like in Figure 1. If you do find corrosion, use a brush and 99% isopropyl alchohol to clean up the corrosion.
- Either if you had no corrosion or have now cleaned the corrosion you'll want to pull your multimeter out and look for shorts. Put your multimeter in diode mode and place the red probe on ground and check both sides of capacitors with the black probe to make sure that no more than 1 side of the capacitor is reading 0.00 or shorted to ground.
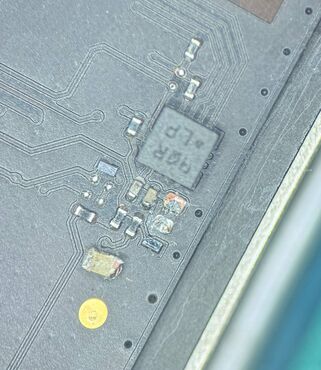
Figure 3. Under the corrosion found in figure 1 there was a shorted capacitor that needed to be removed in order to fix the trackpad (and keyboard) - If you find a capacitor that is shorted to ground on both sides it means that either the capacitor or another part on that power line is shorted and will need to be removed. if the part is pretty obviously damaged or was next to the previously cleaned corrosion like the burnt capacitor in Figure 3 then use your tweezers, or knife to break it off the board.
- After removing the bad cap make sure to double check afterwards that the pads underneath it aren't still shorted to ground, if they are then you still have a short, if one side has a reading and the other is shorted to ground then you've more than likely fixed the trackpad and can now plug it in to test!
- Most capacitors are smoothing caps that have several other caps on the same line, so you don't need to replace them in most cases
