More actions
| MacBook Pro A1278 Won't install or Boot OS fix | |
|---|---|
| Device | MacBook Pro A1278 |
| Affects part(s) | HDD ribbon cable |
| Needs equipment | Screwdriver set, tweezers |
| Difficulty | ◉◌◌◌ Easy |
| Type | Part replacement |
This article is a stub. You can help Repair Wiki grow by expanding it
Problem description
2012 A1278 MacBook Pro fails to install or boot into macOS. The machine can boot into the MacOS installer from an external drive but when attempting to install or boot an OS to or from the internal SSD or HDD the device is very slow and either fails to install the operating system (while attempting an install) or restarts at the end of the loading bar (While attempting to boot).

Symptoms
- Device boot and install times are very slow. While attempting to install an OS the loading bar is constantly calculating install time and the time remaining is sporadic and can jump much higher or much lower
- Device restarts upon reaching the end of the loading bar during boot
- Device can see the storage device, can write to it and can format it but always fails to install macOS
- Device hangs upon reaching the end of an install (around the 1 minute remaining mark) before the setup screen
Solution
In most cases with a 2012 A1278 MacBook Pro with the revised HDD flex cable the solution is to replace the flex cable.
Diagnostic Steps
There's a few ways you can test this!
- Try boot or install macOS to or from an external USB HDD, If the install is successful and or the machine boots it's almost certainly the flex cable
- Try swap the SSD or HDD. In some cases you will not get the exact same errors but for the most part you will either A) Have trouble detecting the device in Disk Utility (Disk Utility stuck on spinning wheel typically) , B) Get a "macOS could not be installed to your computer" error or C) The device will hang upon reaching the end of the install
Repair Steps
This repair is relatively simple and the part needed is easy to obtain and cheap!
You can obtain the HDD flex cable from many places such as eBay, AliExpress and other online retailers. You can also pull this flex cable from a donor device if you have one available!
On eBay the search term " A1278 MacBook Pro HDD Flex Cable" will return a number of results. There are 2 styles of this cable,


This is the revised HDD flex cable from the 2012 A1278. It's easily identified via the much thicker flex cable connecting to the logic board.
The top shows a 2012 A1278 MacBook Pro HDD flex cable and the bottom image showcases a 2009 - 2011 A1278 flex cable.
You will see both styles of cable available in most places and both these cables will work however there are some key things to note about both cables which should help you decide which flex cable you would like to purchase for your device.
The thinner older style cable (part no. 821-1226-A) is SATA II (3.0 Gb/s) and the newer thicker style cable (part no. 821-1480-A) is SATA III (6.0 Gb/s). This means the thicker style cable is the faster cable and in an ideal world would be the cable you would pick.
However, many people (including myself) believe this cable to be more prone to failure than the thinner style cable. This is not to say the thinner style cable doesn't break, they all do. However the 2012 revised cable seems to break a lot more then the thinner style cable. Louis talks about this issue in this video.
You may find differences in aftermarket vs original cables (I've never seen anybody test this, hopefully someone can edit this and tell us if there is any difference!). So you have 2 real choices, the thinner style cable which is slower but seemingly more reliable or the thicker cable which is faster but seemingly less reliable. A good thing to note is that day to day operation of these devices isn't severely impacted either way, the extra speed maybe nice for transferring larger files but having the thinner style cable isn't going to make the machine much slower or unusable! It's really your decision. Another thing of note is that some people report that you cannot install a 2012 HDD flex cable into a 2011 bottom shell without making slight modifications. This is not my experience both cables in both images are fit to a 2011 A1278 MacBook Pro and I did not make any modifications to the shell or cable to make them fit. You can also swap the bottom bracket from cable to cable if you do face this issue however!
Final thing to note with purchasing a new cable is that you can buy either a cable with the bottom bracket or without the bottom bracket. This decision really only comes down to how much you are willing to spend. It's relatively easy to swap the bottom bracket to a new cable but if you have issues seeing very small flex cables you may choose to go for a cable with the bottom bracket to make the repair even easier!
Tools required for the repair
- Phillips PH000 screw driver
- Replacement cable
1) With the device turned off, flip the device so you can remove the 10 Phillips PH000 screws to remove the back cover
Please keep note that the top 3 right screws on the top of the bottom case are much larger than the rest. (The top starts short screw, long screw, long screw, long screw)
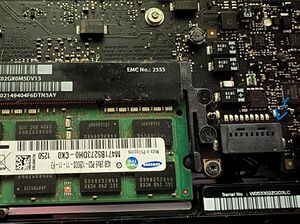
2) Disconnect the battery

Please note while removing the battery connector avoid using a prying tool as there are small components off to the right of the connector that can easily be ripped off if you slip. Ideally use your fingernail and lever the connector up towards you.
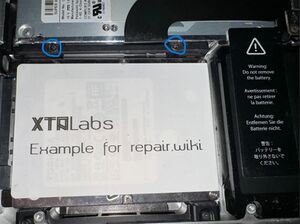
3) Remove the HDD

Using a PH000 Phillips screw driver loosen the 2 screws circled in the picture. These screws are captive and do not come all the way out. Once the screws are loose you should be able to lift the bracket out.
Once you have removed the bracket, you can carefully lift the HDD or SSD out of the laptop enough to disconnect the flex cable and then you can fully remove the HDD or SSD. A good thing to note is that if you are upgrading your MacBook Pro's SSD or HDD during this process you will need to retain the 4 T6 screws that are screwed into the side of your original drive so that you can move them over to the replacement.
4) Remove the cable

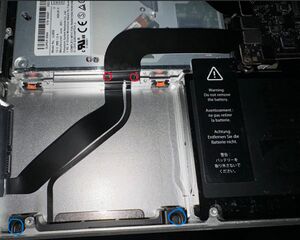
Using a PH000 Phillips screw driver remove the bottom bracket screws (circled in blue). Keep in mind unlike the top bracket these screws are not captive and they do come all the way out.
Then remove the cable screws (circled in red), these screws are also not captive and they are tiny so make sure to store them in a place you will not lose them!
There is 2 ways to remove this cable and both work just fine.
Either push the bracket up and use the leverage you have on the bottom bracket to slowly pull the small section of flex cable up and off the bottom case (It is adhered on) and then disconnect it from the logic board and completely remove the cable from the case or disconnect the flex cable first and use it for leverage to pull the small section up and then out of the case. Either way works. You can also tip a small amount of isopropyl alcohol over the small section of the flex cable to make it remove easier however only do this in the case of a cable that is broken as it will ruin the adhesive. Also make sure the bottom case is fully dry before attempting to adhere the new cable down!
You can clean the old adhesive off with some isopropyl alcohol once removed however in most cases unless the old adhesive is dirty, you really don't need to.
5) Install the new cable!

The final part! If you are using a new cable with a bottom bracket preinstalled this part is just the reverse of removing it. Remove the adhesive protective backing and place the bottom bracket in first (The small portion of the cable should face down so it rests against the housing) screw it in and and rub your finger along the small portion of the cable to ensure it adheres to the housing. Make sure to follow the same path as it was originally installed to avoid bending and damaging the new cable then screw the cable into the housing, connect the cable to the logic board, reconnect your HDD or SSD, screw the bracket back in, reconnect the battery and replace the bottom case and screw it back in and done! Your machine should not face any more errors either booting or installing the OS! :)
For those who went the cheaper route and went for a cable without the bottom bracket there is one more step before you can install the cable. You need to transfer the bottom bracket but don't worry it's pretty easy to do!
Firstly flip the tab on the back of the connecter up (the blue arrow points to it in the image), do this extremely carefully as it's very easy to pull this tab completely off damaging the small flex PCB (Use your fingernail or a very small prying tool, You should not put force on this piece as it should easily open! Don't worry if you break this on your old cable as it's just a part of the cable but be very careful with your new one!). Now slide the orange flex cable out.

As you can see the back of the connector flips up and you can slide the orange flex cable out!
With a small flat plastic prying tool, pry the adhered flex PCB off the bottom bracket. You should now have your bottom bracket separated from the old cable! :)
Now take your new cable and remove the adhesive protective backing from the small flex PCB, place the flex PCB of the new cable on your old bottom bracket and lightly but firmly press it down to ensure it is properly adhered to the bottom bracket. Now once again flip the back tab of the connector up and slide the orange flex cable into the connector (This can be tedious but isn't very hard). Now just follow this step from the start and done!
The images in this guide and this guide was originally made by XTA. Feel free to contact me any time (@xtaxworld on twitter) if you need any assistance with this repair! Feel free to reuse my images or edit this guide to make it more helpful!
