
More actions
Tiago199988 (talk | contribs) (Created guide on how to repair no touch on a iPad 7) |
Tiago199988 (talk | contribs) mNo edit summary |
||
| Line 3: | Line 3: | ||
|Device=IPad 7 | |Device=IPad 7 | ||
|Affects parts=Motherboard | |Affects parts=Motherboard | ||
|Needs equipment= | |Needs equipment=DCPS, Thermal Camera, Soldering Iron, Hot-Air Station, Microscope | ||
|Type=Soldering | |Type=Soldering | ||
|Difficulty=3. Hard | |Difficulty=3. Hard | ||
| Line 13: | Line 13: | ||
The iPad turns but touch doesn't work | The iPad turns but touch doesn't work | ||
[[File: | [[File:IPad 7 Touch Components.png|thumb|IPad 7 Touch Components]] | ||
== Symptoms == | == Symptoms == | ||
<!-- | <!-- | ||
| Line 32: | Line 33: | ||
* The first step is to try a new digitizer. | * The first step is to try a new digitizer. | ||
* Inspect the 2 touch connectors for any physical damage. | * Inspect the 2 touch connectors for any physical damage. | ||
* Take diode readings of the FPC and compare them with the reference image. | * Take diode readings of the FPC and compare them with the reference image on this [https://logi.wiki/index.php/iPad_Diode_Mode_Measurements#Digitizer_Connector_1 Page Thanks to Geek Matics] | ||
* Check every filter connected to the touch connectors. | * Check every filter connected to the touch connectors. | ||
* Check for shorts around the Touch IC. | * Check for shorts around the Touch IC. | ||
Revision as of 21:47, 25 May 2025
This article is a stub. You can help Repair Wiki grow by expanding it
| IPad 7 No Touch | |
|---|---|
| Device | IPad 7 |
| Affects part(s) | Motherboard |
| Needs equipment | DCPS, Thermal Camera, Soldering Iron, Hot-Air Station, Microscope |
| Difficulty | ◉◉◉◌ Hard |
| Type | Soldering |
Problem description
The iPad turns but touch doesn't work

Symptoms
- Touch doesn't work
Solution
The no touch problem can be caused a faulty digitizer or a motherboard problem.
Diagnostic Steps
- The first step is to try a new digitizer.
- Inspect the 2 touch connectors for any physical damage.
- Take diode readings of the FPC and compare them with the reference image on this Page Thanks to Geek Matics
- Check every filter connected to the touch connectors.
- Check for shorts around the Touch IC.
- Measure the diode reading of the SPI_GRAPE_SCLK line below is an image showing where to measure this line and the expected value.
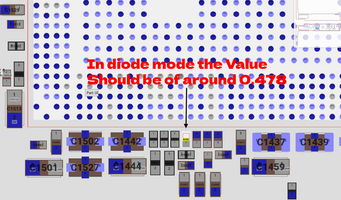
SPI_GRAPE_SCLK Diode Value

Repair Steps
- If a new digitizer resolves the no-touch issue, the repair is straightforward and quick
- If there is physical damage to the FPC connectors, replace them. The best method is to use a hot air station to desolder the old FPC, clean the old solder from the motherboard, apply new solder, align the new FPC, and use the hot air station to solder it. (Be careful not to use excessive heat, as it may melt the FPC).
- When taking diode readings of the FPC, if you measure a line that should read, for example, 0.500V but get 0.100V or 0.000V, it indicates a short on that line. The best way to trace the short is to inject voltage into the line with a DCPS and use a thermal camera to identify which component heats up.
- If you measure a line that should read 0.500V but get OL (Open Line), it indicates a disconnection in the circuit. To trace the issue, consult the board view to follow the line’s path.
- If a filter connected to the touch connectors is open, replace it with one matching the same specifications (refer to the schematics) or source it from a donor board.
- If there is a short on a component near the Touch IC, inject voltage with a DCPS and use a thermal camera to identify which component is heating up.
- If the diode reading of the SPI_GRAPE_SCLK line is low (e.g., near 0V), it indicates a disconnection between the CPU and the motherboard. The only solution is to reball the CPU, a complex repair that should only be performed by an experienced technician.
- If none of the above steps resolve the no-touch issue, the next step is to reball or replace the Touch IC.
Final Testing
Assemble the iPad and ensure that the touch functionality works perfectly. The best way to test this is in the Notes app by drawing lines from end to end. Ensure the iPad doesn't exhibit ghost touches.