
More actions
(Add more repair steps) |
No edit summary |
||
| (One intermediate revision by the same user not shown) | |||
| Line 4: | Line 4: | ||
|Affects parts=Battery | |Affects parts=Battery | ||
|Needs equipment=Picks, Precision Tweezers, Soldering Iron | |Needs equipment=Picks, Precision Tweezers, Soldering Iron | ||
|Type= | |Type=Battery Replacement | ||
|Difficulty=3 | |Difficulty=3. Hard | ||
}} | }} | ||
== Problem description == | == Problem description == | ||
| Line 33: | Line 33: | ||
=== Repair Steps === | === Repair Steps === | ||
Replacement part required: | Replacement part required: 502030 Lithium Polymer battery | ||
# [[File:Muse (2016) 2 pick disassembly.jpg|alt=Using two guitar picks to disassemble a Muse (2016)|thumb|Using two guitar picks to disassemble a Muse (2016)]] | #Open the clips covering the circuitry behind the left ear. Use a pick to pry open a gap, and use a second pick to undo the plastic clips. Note that there are clips on the underside, too.[[File:Muse (2016) 2 pick disassembly.jpg|alt=Using two guitar picks to disassemble a Muse (2016)|thumb|Using two guitar picks to disassemble a Muse (2016)]] | ||
# Use tweezers to carefully remove the ear electrode connection.[[File:Muse (2016) ear electrode disconnection.jpg|alt=Using tweezers to remove the ear electrode connection on the Muse (2016)|thumb|Using tweezers to remove the ear electrode connection on the Muse (2016)]] | |||
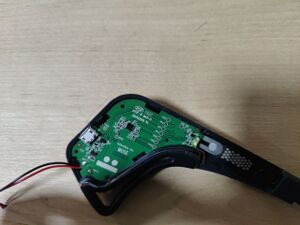
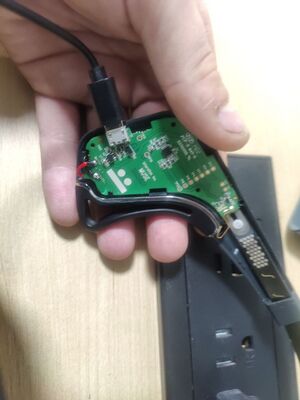
#There is a ribbon cable behind the board that connects to the main electrodes, and the battery is soldered to the board and glued to the back. Partially remove the board to reveal the battery. Be careful not to damage the ribbon cable. You do not need to disconnect the ribbon cable. | #There is a ribbon cable behind the board that connects to the main electrodes, and the battery is soldered to the board and glued to the back. Partially remove the board to reveal the battery. Be careful not to damage the ribbon cable. You do not need to disconnect the ribbon cable.[[File:Using pick to undo battery glue on Muse (2016).jpg|alt=Using a guitar pick to pry the battery in the Muse (2016) loose|thumb|Using a guitar pick to pry the battery in the Muse (2016) loose]] | ||
#Taking care to make sure not to puncture or otherwise damage the battery, use a guitar pick to pry the battery loose. It can take quite a lot of force to remove the adhesive, so you don't need to be gentle, just be careful. | #Taking care to make sure not to puncture or otherwise damage the battery, use a guitar pick to pry the battery loose. It can take quite a lot of force to remove the adhesive, so you don't need to be gentle, just be careful. | ||
#With the battery loose, desolder the battery connections, ideally with a chisel or other large tip. The ground plane is large and requires a lot of heating with a normal tip. | #With the battery loose, desolder the battery connections, ideally with a chisel or other large tip. The ground plane is large and requires a lot of heating with a normal tip.[[File:Muse (2016) with desoldered battery.jpg|alt=Muse (2016) with desoldered battery|thumb|Muse (2016) with desoldered battery]] | ||
#Insert the replacement battery into the area the previous battery was, and lay the wires in the indent in the enclosure. You may have to cut into the battery's kapton tape so that the wires can exit in the right place. | |||
#Put the board back in place. Use tweezers to reseat the ear electrode connection. You may have to push on the ends for it to be seated correctly. If seated correctly, the bumps will be aligned and the entire connector will be approximately the same height as the surrounding plastic.[[File:Muse (2016) replacement battery properly positioned.jpg|alt=Muse (2016) replacement battery properly positioned|thumb|Muse (2016) replacement battery properly positioned]] | |||
#Solder the battery connections to the battery pads. | |||
#Plug in the Muse's to a micro-USB charger. '''The Muse will not turn on until it receives power via the USB port after a battery replacement'''. If you see the Muse charging, then you've successfully replaced the battery.[[File:Muse (2016) with battery replaced and power applied.jpg|alt=Muse (2016) with battery replaced and power applied|thumb|Muse (2016) with battery replaced and power applied]] | |||
#Replace the cover. If the ear electrode is incorrectly seated, the cover will not be able to be replaced and you will have to use tweezers to put it in place (see step 7). | |||
Latest revision as of 10:49, 27 November 2025
This article is a stub. You can help Repair Wiki grow by expanding it
| Muse (2016) Battery Replacement | |
|---|---|
| Device | Muse (2016) |
| Affects part(s) | Battery |
| Needs equipment | Picks, Precision Tweezers, Soldering Iron |
| Difficulty | ◉◉◉◌ Hard |
| Type | Battery Replacement"Battery Replacement" is not in the list (Soldering, Teardown, Part replacement, Cleaning, Software, BGA, General) of allowed values for the "Repair Guide type" property. |
Problem description
Muse (2016) does not hold a charge. This is likely the result of a degraded battery.
Symptoms
- Battery life less than two hours
- Connectivity issues
WARNING: If your battery life is significantly less than expected, your battery may have degraded. If you are unable to get the device repaired, you should dispose of it, as degraded Li-Ion batteries are a fire risk.
Solution
Replace the battery.
Diagnostic Steps
Repair Steps
Replacement part required: 502030 Lithium Polymer battery
- Open the clips covering the circuitry behind the left ear. Use a pick to pry open a gap, and use a second pick to undo the plastic clips. Note that there are clips on the underside, too.
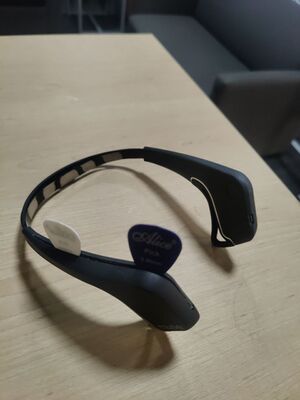
Using two guitar picks to disassemble a Muse (2016) - Use tweezers to carefully remove the ear electrode connection.
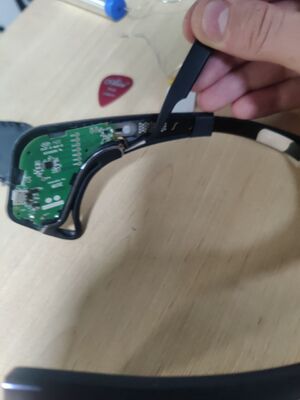
Using tweezers to remove the ear electrode connection on the Muse (2016) - There is a ribbon cable behind the board that connects to the main electrodes, and the battery is soldered to the board and glued to the back. Partially remove the board to reveal the battery. Be careful not to damage the ribbon cable. You do not need to disconnect the ribbon cable.
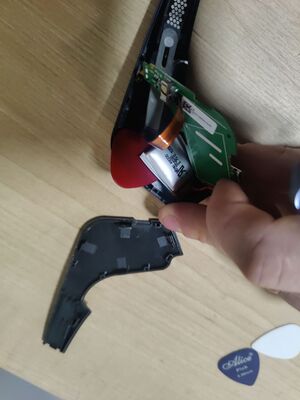
Using a guitar pick to pry the battery in the Muse (2016) loose - Taking care to make sure not to puncture or otherwise damage the battery, use a guitar pick to pry the battery loose. It can take quite a lot of force to remove the adhesive, so you don't need to be gentle, just be careful.
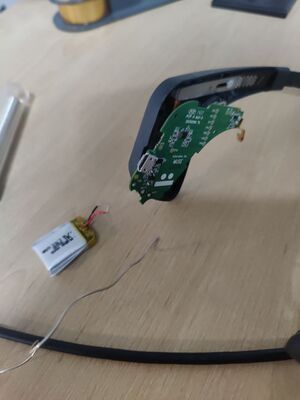
- With the battery loose, desolder the battery connections, ideally with a chisel or other large tip. The ground plane is large and requires a lot of heating with a normal tip.
Muse (2016) with desoldered battery - Insert the replacement battery into the area the previous battery was, and lay the wires in the indent in the enclosure. You may have to cut into the battery's kapton tape so that the wires can exit in the right place.
- Put the board back in place. Use tweezers to reseat the ear electrode connection. You may have to push on the ends for it to be seated correctly. If seated correctly, the bumps will be aligned and the entire connector will be approximately the same height as the surrounding plastic.
Muse (2016) replacement battery properly positioned - Solder the battery connections to the battery pads.
- Plug in the Muse's to a micro-USB charger. The Muse will not turn on until it receives power via the USB port after a battery replacement. If you see the Muse charging, then you've successfully replaced the battery.
Muse (2016) with battery replaced and power applied - Replace the cover. If the ear electrode is incorrectly seated, the cover will not be able to be replaced and you will have to use tweezers to put it in place (see step 7).
_2_pick_disassembly.jpg)
_ear_electrode_disconnection.jpg)
.jpg)
_with_desoldered_battery.jpg)
_replacement_battery_properly_positioned.jpg)
_with_battery_replaced_and_power_applied.jpg)