More actions
No edit summary |
No edit summary |
||
| Line 1: | Line 1: | ||
{{Repair Guide | {{Repair Guide | ||
|Device= | |Device=Micro Master 440 6SE6440-2UD31-1CA1 | ||
|Affects parts= | |Affects parts=Main power relay | ||
|Needs equipment= | |Needs equipment=multimeter, soldering iron, soldering station | ||
|Type= | |Type=Soldering, Part replacement | ||
|Difficulty= | |Difficulty=3. Hard | ||
}} | }} | ||
==Problem description== | ==Problem description== | ||
Latest revision as of 11:36, 18 July 2024
| Micro Master 440 fault F0022 repair | |
|---|---|
| Device | Micro Master 440 6SE6440-2UD31-1CA1 |
| Affects part(s) | Main power relay |
| Needs equipment | multimeter, soldering iron, soldering station |
| Difficulty | ◉◉◉◌ Hard |
| Type | Soldering, Part replacement |
Problem description
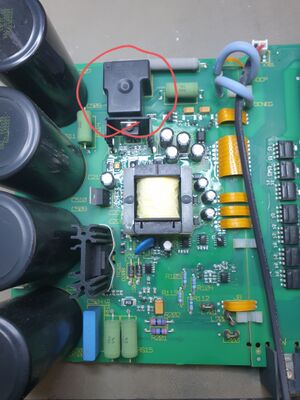
Repairing one of the causes for fault code F0022 "Power stack fault" on Siemens micromaster 440 inverter. This solution concerns the main power relay (figure 1)

Symptoms
- Works until a certain frequency/power then shows error F0022
- General fault F0022 even before starting the motor
- Shows fault F0022 as soon as starting the motor
Solution
- First confirm that the main IGBT module is not damaged in any way.
- Measure each individual IGBT as described here.
- If the IGBT module is okay, look under the main power relay.
- In my case, one of the legs was not soldered properly and it was black from overheating.
- Take out the relay and confirm that it's working by injecting voltage on it's coil and measuring the contacts.
- If the relay is working properly, repair the hole for the leg or run a thick wire jumper to where it's supposed to go (the wire on the side going to the adjacent PCB, measure with continuity to confirm which exact one).
- After this the inverter should work properly
