
More actions
(Created page with "{{Repair Guide |Device=Galaxy A53 5G |Affects parts=Logic Board |Needs equipment=Soldering Iron, Hot Air Station, Microscope |Type=Soldering, BGA |Difficulty=4. Specialist }} {{stub}} == Problem description == <!-- Provide a concise description of the issue here. Be as specific as possible to help readers quickly determine whether or not this is the exact problem they are facing. --> You have tried to replace the main FPC connector and display and the problem persists...") |
No edit summary |
||
| (One intermediate revision by the same user not shown) | |||
| Line 1: | Line 1: | ||
{{Repair Guide | {{Repair Guide | ||
|Device=Galaxy | |Device=Galaxy A13 5G | ||
|Affects parts=Logic Board | |Affects parts=Logic Board | ||
|Needs equipment=Soldering Iron, Hot Air Station, Microscope | |Needs equipment=Soldering Iron, Hot Air Station, Microscope | ||
| Line 11: | Line 11: | ||
Provide a concise description of the issue here. Be as specific as possible to help readers quickly determine whether or not this is the exact problem they are facing. | Provide a concise description of the issue here. Be as specific as possible to help readers quickly determine whether or not this is the exact problem they are facing. | ||
--> | --> | ||
You have | You have a phone that does not charge but it works with charged battery. It could have happened due to faulty charger/short on cable or something similar. | ||
== Symptoms == | == Symptoms == | ||
| Line 23: | Line 17: | ||
Detail all measurable or observable symptoms in this section. | Detail all measurable or observable symptoms in this section. | ||
--> | --> | ||
* | * Phone does not charge at all | ||
* | * No charging logo on top(near battery) | ||
* Does not connect to PC | |||
* Burned charging port | |||
* Customer said happened with bad charger/usb cable | |||
=== Diagnostic Steps === | === Diagnostic Steps === | ||
This is how to diagnose and repair the no charging fault: | |||
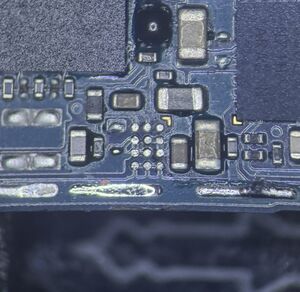
* Check if these diode values on fpc are ok. | |||
* Check | |||
[[File:DP DM on conn.png|center|thumb|Required for Charging]] | |||
* ALL OF THE VOLTAGE CHECKINGS BELOW SHOULD BE DONE ONLY BY INSERTING A CHARGER AND NOT A BATTERY. IF YOU WANT TO CHECK GR SHOULD BE WITHOUT ANY SOURCE OF POWER(CHARGER OR BATTERY) | |||
[[File:Ic's to check.png|center|thumb|ic's to check]] | |||
[[File:IC and Diode value.png|center|thumb|IC's and Diode value]] | |||
* Check for 5v input in the VBUS IN capacitor: | |||
** if ok then check check on VBUS IF FL(bypassable coil): | |||
*** If voltage is ok then skip the next step | |||
* If no voltage in VBUS IF FL then you most likely have a fused OverVoltage Pritection ic. There are 2 ways to fix it. | |||
*# Change the OVP IC with a similar one. | |||
*# You can bypass it but by bypassing it you will have higher risk to damage a chaging ic in future because of faulty chargers/cables. | |||
*#* Bypass the OVP IC: remove the OVP IC and make the same exact jumper(short VBUS IN to VBUS IF) shown in the picture below | |||
*#* [[File:Removed ovp ic.jpg|center|thumb|removed ovp ic]] | |||
[[File:Bypassed OVP IC.jpg|center|thumb|Bypassed OVP IC]] | |||
[[File: | |||
* Check for Voltage on VPH COIL(3.7-4.2v) Should have stable voltage and no fluctuation. | |||
** If voltage is not stable then check GR of VPH COIL, if okay then the problem could be the charging ic(replace charging ic) | |||
* Check for GR and voltage on BOOTCAP | |||
** Should have 3.7-4.2v in one side and the other side should have almost the double voltage of it | |||
** if it doesn't then you could have a faulty bootcap or faulty charging ic. | |||
** Check for faulty BOOTCAP: probe both sides of bootcap and check for short, if does not show low gr then its considred ok. | |||
** '''<u>Note:</u>''' If you have a faulty bootcap then the problem you will most likely face is fake charging. | |||
** Your problem should be solved by replacing charging ic.<br /> | |||
Latest revision as of 19:23, 24 August 2025
| Samsung Galaxy A13 5G(A137) Not Charging | |
|---|---|
| Device | Galaxy A13 5G |
| Affects part(s) | Logic Board |
| Needs equipment | Soldering Iron, Hot Air Station, Microscope |
| Difficulty | ◉◉◉◉ Specialist |
| Type | Soldering, BGA |
This article is a stub. You can help Repair Wiki grow by expanding it
Problem description
You have a phone that does not charge but it works with charged battery. It could have happened due to faulty charger/short on cable or something similar.
Symptoms
- Phone does not charge at all
- No charging logo on top(near battery)
- Does not connect to PC
- Burned charging port
- Customer said happened with bad charger/usb cable
Diagnostic Steps
This is how to diagnose and repair the no charging fault:
- Check if these diode values on fpc are ok.

- ALL OF THE VOLTAGE CHECKINGS BELOW SHOULD BE DONE ONLY BY INSERTING A CHARGER AND NOT A BATTERY. IF YOU WANT TO CHECK GR SHOULD BE WITHOUT ANY SOURCE OF POWER(CHARGER OR BATTERY)


- Check for 5v input in the VBUS IN capacitor:
- if ok then check check on VBUS IF FL(bypassable coil):
- If voltage is ok then skip the next step
- if ok then check check on VBUS IF FL(bypassable coil):
- If no voltage in VBUS IF FL then you most likely have a fused OverVoltage Pritection ic. There are 2 ways to fix it.
- Change the OVP IC with a similar one.
- You can bypass it but by bypassing it you will have higher risk to damage a chaging ic in future because of faulty chargers/cables.
- Bypass the OVP IC: remove the OVP IC and make the same exact jumper(short VBUS IN to VBUS IF) shown in the picture below
removed ovp ic


- Check for Voltage on VPH COIL(3.7-4.2v) Should have stable voltage and no fluctuation.
- If voltage is not stable then check GR of VPH COIL, if okay then the problem could be the charging ic(replace charging ic)
- Check for GR and voltage on BOOTCAP
- Should have 3.7-4.2v in one side and the other side should have almost the double voltage of it
- if it doesn't then you could have a faulty bootcap or faulty charging ic.
- Check for faulty BOOTCAP: probe both sides of bootcap and check for short, if does not show low gr then its considred ok.
- Note: If you have a faulty bootcap then the problem you will most likely face is fake charging.
- Your problem should be solved by replacing charging ic.