CRT General Repairs

From Repair Wiki
Revision as of 11:45, 2 March 2024 by ASRepairs (talk | contribs)
(diff) ← Older revision | Latest revision (diff) | Newer revision → (diff)
CRT General Repairs
Type Troubleshooting/Diagnostics
Device(s) CRT Displays
Difficulty ◉◉◉◌ Hard

CRT (cathode ray tube) are found on older televisions, monitors, and other equipment.

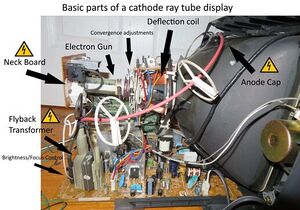
Inside of CRT television with basic components labelled.
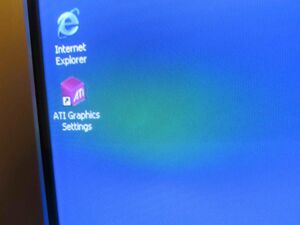
An example of magnet damage/distortion.

Safety Warning:

CRT displays contain extremely high voltage (up to 30,000v!) and the acts as a capacitor which can store a lethal charge for weeks after the display has been unplugged. The tube MUST be discharged properly before performing any kind of internal repairs.

Here is a good guide to refer to for discharging CRTs: https://www.youtube.com/watch?v=1CVXzlkOjGg

CRTs also contain mains voltage so general electrical safety precautions should be taken when working on them.

Service Manuals:

Due to the facts that most CRTs come from a time when repair was more common and companies didn't claim it was a security risk to have someone replace a failed capacitor, complete service manuals that included full schematics were often given out to independent repair shops, in the cases of older televisions they may have even been included with the television. Many of these manuals and schematics are now available online, simply look up the model of your TV/monitor and look for a service manual.

Descriptions and service manuals for Commodore monitors can be found here: Commodore monitors

Repairs

Symptom/Issue Fix
General geometry issues, one side of screen is too disproportionally sized or is generally not scanning properly Although a wide variety of things can cause such issues, one of the most common failures and causes of all sorts of issues in CRTs is capacitor failure. Low quality or aging electrolytic capacitors are often to blame for issues with CRT displays. Here are some general steps for troubleshooting capacitors:
  • Start by doing a quick glance at all the circuit boards, if you see any clearly leaking or bulged capacitors then replace them and clean any potential leakage from the PCB. If you see any capacitors that have blown up or otherwise failed catastrophically then it would be advisable to check the surrounding components that connect to the capacitor as one of them being bad could have caused the cap to fail. (Having the schematic will make this much easier.)
  • Check the capacitors that are near whatever function is not working properly (so if geometry is bad then check the caps that surround the deflection coil plug) If you have a schematic then you can use it to see exactly what capacitors effect the function you are having issues with.
  • If you display has capacitors on the neck board or has any daughterboards then also check those, since the daughterboard can sometimes contain vital components like the jungle chip and contain capacitors.
  • Since no 2 displays are the same, there is no definitive guide as to which capacitors go bad and cause what, the best way to figure out what capacitor to replace is by looking at the board and the schematic.
-Crackling, smoke smell, electrical spark sound that causes an temporary screen blackout.

-High voltage is present but screen is showing no sign of life.

Although this can be an issue with the tube itself, at times these issues can sometimes be caused by issues with the neck board or flyback circuit, sometimes even just dust.
  • The first thing to try would be to remove all dust from the inside of the display, particularly the high voltage areas near the flyback and on the neck board. Sometimes dust build-up can cause a ack of contact between the CRT and the socket.
  • If removing the dust doesn't work then it is advisable to check the neck board for failed components. A bad component on the neck board could be providing a path to ground (which the high voltage will gladly take if presented with the opportunity.) Also the neck board has components that connect direcly into the CRT socket (by extension the CRT itself.) If these have failed then it can cause major issues with the CRT. Check the neck board for failed components and if you find any replace them.
  • Checking for cracked traces or any bad connections on the neck board and flyback circuits. Any cracked trace can mean high voltage is arcing across it, causing a smoke smell and crackling sound, If any are found them repair them with whatever method you choose. Bad connections includes the one with the CRT and the socket, check for any sign of corrosion or other build-up on the CRT pins and in the socket.
  • Check for failed components surrounding the flyback circuit, if something is not working correctly then flyback could be creating too high voltage which can cause arcing and damage to the tube.
Magnet damage, screen is badly distorted in colour and/or geometry. "Magnet damage" in this case refers to when the internal parts of the tube have been affected by a magnet being brought near then which messes up a bunch of things and may make the display seem unusable, however it can sometimes be fixed (depending on severity.) The display needs to be degaussed there are 2 main ways to do this.
  • Using the internal degaussing function: More modern CRT displays will often contain some for on an internal degaussing coil that can be activated from the OSD controls. On monitors it can be found in the user settings or even as a discrete button, the symbol for a degauss button/function is a horseshoe magnet with a cross through it. In TVs it may need to be accessed through a service menu or a service remote, refer to your TV's service manual to see how to access it. Run a single degauss, if it does not fix the problem the wait a few minuets and then degauss again, if it still does not help or does not fully restore the screen then move on to the second method.
  • Using an external degaussing tool: An external degauss coil will be more powerful and effective than the internal function. To do this you will need either a degaussing coil (which can be purchased on eBay) or a strong neodymium magnet. For a degauss coil you simply hold the coil to the screen, turn it on, then slowly pull it away from the screen. To degauss with a neodynium magnet you hold the magnet up the screen then spin the magnet while slowly pulling it away from the screen.
Damaged or failed tube (glass not cracked or broken) In many cases a damaged or failed tube is death knell for a CRT, the tube is the most expensive single part of the display and now that they are no longer in production finding a specific one is harder and more expensive then before. Years ago a damaged tube could be repaired at a component level by carefully cutting open the tube neck then literally rebuilding the electron gun, however shops that used to do this have all closed. The museum of early televisions has CRT rebuild equipment and is looking to one day offer it as a service to consumers. So if your tube has failed and you are dead set on keeping the display alive it may be worth holding out for that service to be available.
Damaged tube (glass cracked or broken) At this point the only way to fix the display is to replace the tube; if you can find a tube for your display for a good price then replacing is fairly straightforward and a service manual can provide additions details.

https://www.earlytelevision.org/crt_rebuilding_at_museum.html