Sony WM-F2078 Screeching noise, tinny out of phase audio and Nvidia GPU Memory Testing Guide: Difference between pages
No edit summary |
No edit summary |
||
| Line 1: | Line 1: | ||
{{ | {{Explanatory Guide | ||
|Device= | |Device=Nvidia GPUs | ||
| | |Type=Troubleshooting/Diagnostics | ||
|Difficulty=2. Medium | |||
|Difficulty= | |||
}} | }} | ||
So, your card has all voltages and you have verified that the bios circuit is working as it should but you still have no output from the card. Or there is output but you have artifacts, crashing under load, abnormal behavior etc. Well, you probably have a faulty memory chip and you've come to the right place. | |||
-Replacing memory chips is a difficult procedure requiring BGA soldering experience and the proper equipment. If you do not have the tools or the experience, you should let an expert do it for you.- | |||
[https://youtu.be/xWtrgq1G1fM Video example.] | |||
==Nvidia MOdular Diagnostic Software (aka Nvidia MODS)== | |||
[https://pdfcoffee.com/modspdf-pdf-free.html MODS] is a very powerful tool that tests Nvidia cards for different kinds of faults. It includes a standalone tool called MATS that tests memory specifically. If you do have access to it, this guide will show how to use MATS and identify faulty memory chips. | |||
==Memory Channel Labeling== | |||
[[File:Nvidia memory labeling pascal.jpg|link=link=https://repair.wiki/w/File:Nvidia_memory_labeling_pascal.jpg|thumb|Memory labeling example Pascal (Figure 1)]] | |||
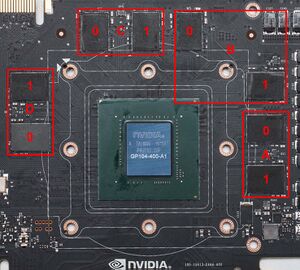
As shown in Figure 1 each channel consists of 2 memory chips, 0 and 1. For a card with N GB VRAM, there is N/2 channels. in that example, there are four memory channels (256 bit) in the 8GB GTX 1080. | |||
Memory modules are counted counter clockwise starting from the OPPOSITE corner of the golden arrow on the core. Starting from A1, A0, B1, B0... to X1, X0. (X being the last channel) | |||
==Using MATS with a card that has no output== | |||
You'll need either a CPU with an integrated GPU (any Intel CPU since Sandy Bridge, or an AMD APU) or a secondary video card to get the screen output. | |||
After booting into MODS, type the following commands to start testing the memory: | |||
<code>./mods gputest.js -skip_rm_state_init -mfg</code> | |||
and then: | |||
<code>./mats -n [card index] -e [memory size to test in MB]</code> | |||
Index should be 1 if you are using integrated graphics or a dedicated GPU with a CPU that has no integrated. | |||
Memory size to test should be at least 5, recommended 50. Higher numbers will take longer to finish. | |||
=== | After the test finishes, you will get a report.txt file that has the result of the test inside. Alternatively, you can add <code>|less</code> to the end of the 2nd command to show the results immediately after the test ends on the screen. | ||
==Using MATS with a card that has output.== | |||
This is a bit easier since you don't have to enter the first command or an index, just enter <code>./mats -e [memory size to test in MB]</code> and the test will run. You can still add <code>|less</code> to the end to show the report on the screen. | |||
==Identifying the faulty memory bank(s)== | |||
[[File:Mats example.jpg|link=link=https://repair.wiki/w/File:Mats_example.jpg|thumb|Example report on an RTX 2060 (Figure 2)]] | |||
[[File:2060 memory example.jpg|link=link=https://repair.wiki/w/File:2060_memory_example.jpg|thumb|RTX 2060 faulty memory chips (Figure 3)]] | |||
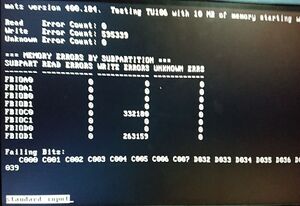
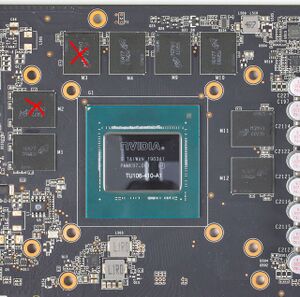
Reading the report example in Figure 2, MATS found errors on D1 and C0, which correspond to the memory chips marked in Figure 3. | |||
Usually, only one chip fails and makes the card not output a picture or displays artifacts. In this case however, there was a problem with 2 chips which points to a IMC (Integrated Memory Controller) fault which is inside the core. Luckily, this particular card was dropped by the user. Taking the memory chips off, cleaning the pads and resoldering the chips back fixed it. | |||
If you get errors on all channels though, it's either the IMC or a power related issue that either killed all the memories or is not suppling enough power to them. The failing bits can sometimes tell you if the issue is the memory itself or the IMC but replace the memory to make sure. | |||
==MODS/MATS version compatibility== | |||
{| class="wikitable" | |||
|+ | |||
!MODS/MATS version | |||
!Supported cards | |||
|- | |||
|367.xxx | |||
|GTX 1000 and below | |||
|- | |||
|400.xxx | |||
|RTX 2000 and below (inc. GTX 16XX series) | |||
|- | |||
|455.xxx | |||
|RTX 3000 and below | |||
|} | |||
[[Category:Nvidia Computer Components]] | |||
Revision as of 15:27, 30 March 2024
| Nvidia GPU Memory Testing Guide | |
|---|---|
| Type | Troubleshooting/Diagnostics |
| Device(s) | Nvidia GPUs |
| Difficulty | ◉◉◌◌ Medium |
So, your card has all voltages and you have verified that the bios circuit is working as it should but you still have no output from the card. Or there is output but you have artifacts, crashing under load, abnormal behavior etc. Well, you probably have a faulty memory chip and you've come to the right place.
-Replacing memory chips is a difficult procedure requiring BGA soldering experience and the proper equipment. If you do not have the tools or the experience, you should let an expert do it for you.-
Nvidia MOdular Diagnostic Software (aka Nvidia MODS)
MODS is a very powerful tool that tests Nvidia cards for different kinds of faults. It includes a standalone tool called MATS that tests memory specifically. If you do have access to it, this guide will show how to use MATS and identify faulty memory chips.
Memory Channel Labeling
As shown in Figure 1 each channel consists of 2 memory chips, 0 and 1. For a card with N GB VRAM, there is N/2 channels. in that example, there are four memory channels (256 bit) in the 8GB GTX 1080.
Memory modules are counted counter clockwise starting from the OPPOSITE corner of the golden arrow on the core. Starting from A1, A0, B1, B0... to X1, X0. (X being the last channel)
Using MATS with a card that has no output
You'll need either a CPU with an integrated GPU (any Intel CPU since Sandy Bridge, or an AMD APU) or a secondary video card to get the screen output.
After booting into MODS, type the following commands to start testing the memory:
./mods gputest.js -skip_rm_state_init -mfg
and then:
./mats -n [card index] -e [memory size to test in MB]
Index should be 1 if you are using integrated graphics or a dedicated GPU with a CPU that has no integrated.
Memory size to test should be at least 5, recommended 50. Higher numbers will take longer to finish.
After the test finishes, you will get a report.txt file that has the result of the test inside. Alternatively, you can add |less to the end of the 2nd command to show the results immediately after the test ends on the screen.
Using MATS with a card that has output.
This is a bit easier since you don't have to enter the first command or an index, just enter ./mats -e [memory size to test in MB] and the test will run. You can still add |less to the end to show the report on the screen.
Identifying the faulty memory bank(s)
Reading the report example in Figure 2, MATS found errors on D1 and C0, which correspond to the memory chips marked in Figure 3.
Usually, only one chip fails and makes the card not output a picture or displays artifacts. In this case however, there was a problem with 2 chips which points to a IMC (Integrated Memory Controller) fault which is inside the core. Luckily, this particular card was dropped by the user. Taking the memory chips off, cleaning the pads and resoldering the chips back fixed it.
If you get errors on all channels though, it's either the IMC or a power related issue that either killed all the memories or is not suppling enough power to them. The failing bits can sometimes tell you if the issue is the memory itself or the IMC but replace the memory to make sure.
MODS/MATS version compatibility
| MODS/MATS version | Supported cards |
|---|---|
| 367.xxx | GTX 1000 and below |
| 400.xxx | RTX 2000 and below (inc. GTX 16XX series) |
| 455.xxx | RTX 3000 and below |


